Click Chart >
Export > Patient Data.
NOTE: You can also access the Export Patient Data dialog for an individual
patient. To do this, when a patient's chart is opened, click Chart
> Export > Patient
Data. The Export Patient Data dialog will open with the patient
selected and the Patient area will be grayed out.
In the Export Patient Data dialog, click the Note Selection (Clinical Summary) option
to export a Clinical Summary document for a single patient; or, click
the Date Range option to export
a Continuity of Care Document (CCD) for a single, or multiple patients,
as needed.
If Note Selection (Clinical Summary)
option is selected, go to step 3. If the Date
Range option is selected, go to step 11.
When the Note
Selection (Clinical Summary) option is selected, start typing any
combination of the patient's Name,
DOB, or Account
# in the Patient field. The list below will begin filtering patients
based on the typed text.
NOTE: Patients with restricted charts will not be displayed if the
user accessing the Export Patient Document dialog does not have permission
to view that patient's chart. However, if that user has the Break the
Glass privilege, they are able to export patient documents for those patient's
with restricted charts.
Once the patient is located, highlight the applicable
Patient.
In the Options section of the Export Patient Data
dialog, select the specific Note
or Lab you want to export in the
Note field.
Check the Password
protect file option, if you would like to encrypt the if you would
like to encrypt the XML output file with a password to ensure security.
Check the Close
window after Save/Print option, if you want the Export Patient
Document dialog to close after the exported document has been saved or
printed.
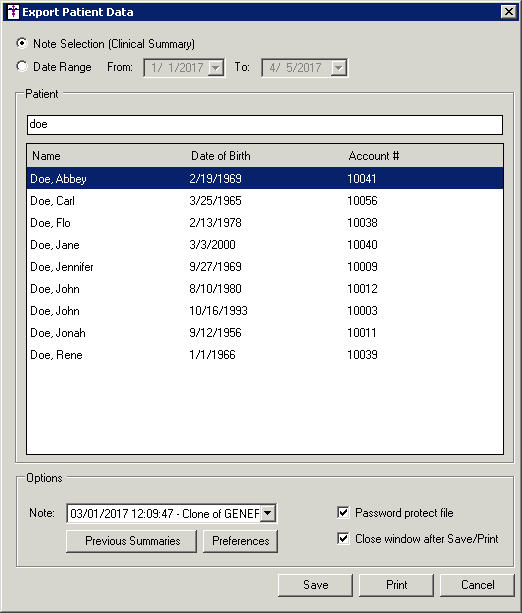
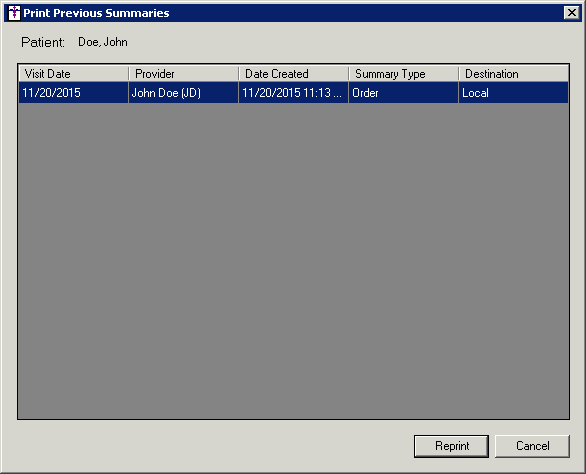
To view any clinical summaries and/or procedure
orders that have been previously printed for a selected patient, click
the Previous Summaries button.
In the Print Previous Summaries dialog, the patient's previously printed
clinical summaries and procedure orders will be listed. To reprint a previously
printed summary, highlight the item you want to reprint, and then click
the Reprint button.
To configure the exclusion
preferences when exporting clinical summaries, click the Preferences
button.
In the Exclusion Display Settings section of the Clinical Summary User
Preferences dialog, you can select when to display the exclusions dialog
by checking the applicable options.
In the Clinical Summary Display Settings section, check the Do
not display 'information not applicable to today's visit' sections in
the Clinical Summary option, if you only want to export information
regarding today's specific visit. When this option is selected, no information
that is not pertinent to today's visit will be exported. Check the Suppress comments on the Clinical Summary
option if you want to suppress any comments attached to the diagnoses
or medications form being exported to the HTML file. This option is not
available for the XML format.

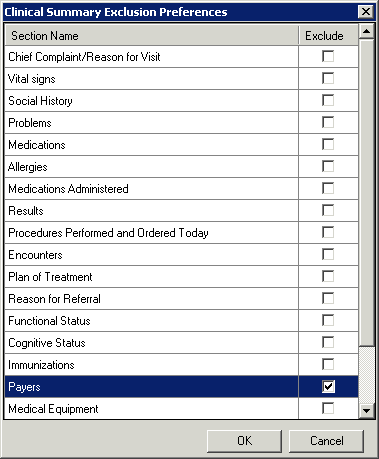
If you would like to configure specific sections of the Clinical Summary
that will be excluded by default when exporting, click the Configure
button. In the Clinical Summary Exclusion Preferences dialog the sections
of the Clinical Summary will be displayed. To exclude a section from being
exported by default, check the Exclude
box next to the applicable section. When finished, click the OK
button.
Go to step 19.
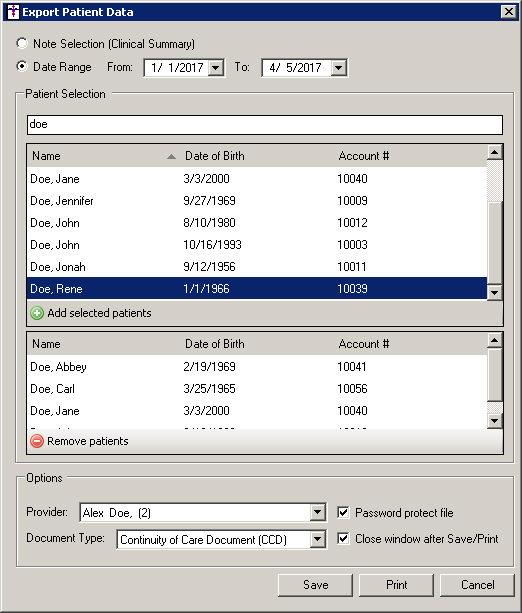
When the Date
Range option is selected, select a From
and To date for the date range
you would like to capture in the exported document.
Next, start typing any combination of the patient's
Name, DOB,
or Account # in the Patient field.
The list below will begin filtering patients based on the typed text.
NOTE: Patients with restricted charts will not be displayed if the
user accessing the Export Patient Document dialog does not have permission
to view that patient's chart. However, if that user has the Break the
Glass privilege, they are able to export patient documents for those patient's
with restricted charts.
Once the patient is located, highlight the applicable
Patient, and then click the Add selected patients button. You can
also press the CTRL and Shift keyboard buttons to select multiple
patients in the list, and then click the Add
selected patients button.
The selected patients selected will appear in the lower pane. In an
similar manner as adding selected patients, you can remove patients from
the selected patients (lower) pane, by highlighting the applicable patient(s),
and then clicking the Remove patients
button.
Repeat steps 12 - 13 until all applicable patients
have been selected.
In the Options section of the Export Patient Date
dialog, select the applicable Provider
for the document you are exporting.
In the Document Type section, select Continuity
of Care Document (CCD) or Referral
Summary.
NOTE: When the Referral Summary is selected as the Document Type, the
system will generate a Referral Summary note for each of the patients
selected that have an open referral for the date range specified.
Check the Password
protect file option, if you would like to encrypt the XML output
file with a password to ensure security.
Check the Close
window after Save/Print option, if you want the Export Patient
Document dialog to close after the exported document has been saved or
printed.
When all of the export information has been configured
and selected, click the Save button
to export the patient data to a file, or click the Print
button to print the exported data.
NOTE: If the Close window after Save/Print
option is selected, the Export Patient Document dialog will close after
the exported document has been saved or printed.
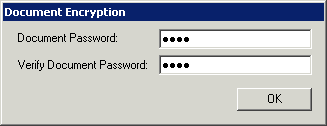
If the Password protect file options was selected,
a Document Encryption dialog will appear allowing you to enter a Document Password, and verify that password
in the Verify Document Password
field.
If saving to file, the Browse
For Folder dialog will appear allowing you to select the location
for the saved zipped file. When saving the export to a file, the system
will create a zipped file containing an XML file that can be password
encrypted, and an HTML file (Human Readable Format) for each CDD or Clinical
Summary for each patient included in the export. When the location has
been selected, click the OK button.

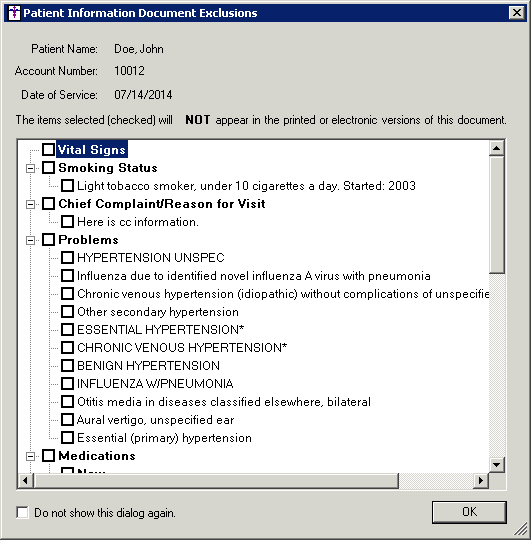
When exporting a Clinical Summary, a Patient Information
Document Exclusions dialog will appear, allowing you to select the applicable
data you wish to exclude from the summary document you are exporting,
if applicable. When finished setting the exclusions, click the OK
button.
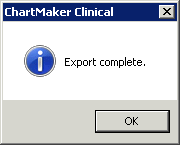
Click the OK
button when the export is complete. The zipped file containing the applicable
XML and HTML files has been created in the designated location.