Click Chart >
Import > From HIE.
In the Select
patient field of the Import Document from HIE dialog, enter the
patient name (Last name, First
name) that you would like to import information for, and then in the list
below highlight the applicable patient.
In the Select
import details section, you can select the appropriate HIE
and Provider, as needed, and then
click the Next button.

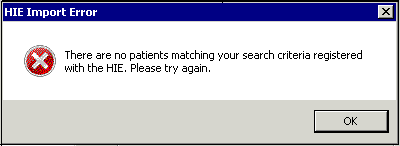
If the patient selected above is not found on
the HIE, a HIE Import Error dialog will appear with the following message:
"There are no patients matching your search criteria registered with
the HIE. Please
try again." Click the OK
button.
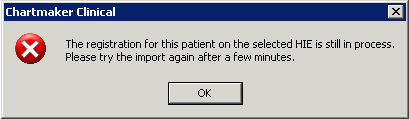
If the Import Consent flag was just set to YES,
and you try to import from HIE immediately, it is possible that
you will receive a message that the registration for this patient is still
in process. The HIE needs to register this consent prior to allowing any
information exchange. Please
wait approximately 15 minutes and try the download again. Click the OK button.
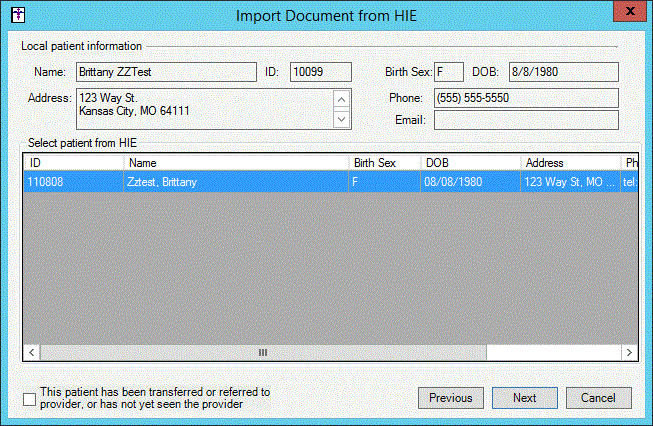
When the HIE matches on a patient, a dialog will
appear indicating the match. If there are multiple patients that match,
select the applicable patient. You can also check or uncheck the This patient has been transferred or referred
to provider, or has not yet seen the provider option, if applicable.
When this option is selected, it will be counted toward any applicable
Meaningful Use and MIPS 2018 performance measures. After the applicable
patient and options have been selected as needed, click the Next
button.
If there are multiple documents to download from
the HIE, an Import Document from HIE
dialog will appear listing all of the documents. Highlight the document
you want to download, and then click the Finish
button.
Do note, if there was only one document to download, the system will
automatically download that document and the Import Document from HIE
dialog will not appear.

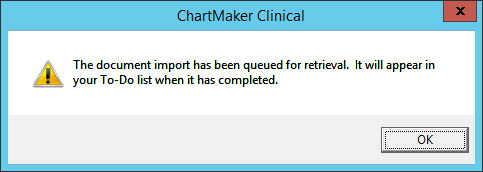
A message stating that the document will then
be queued for retrieval and will appear in your To-Do List when it has
completed will then appear. Click the OK
button.
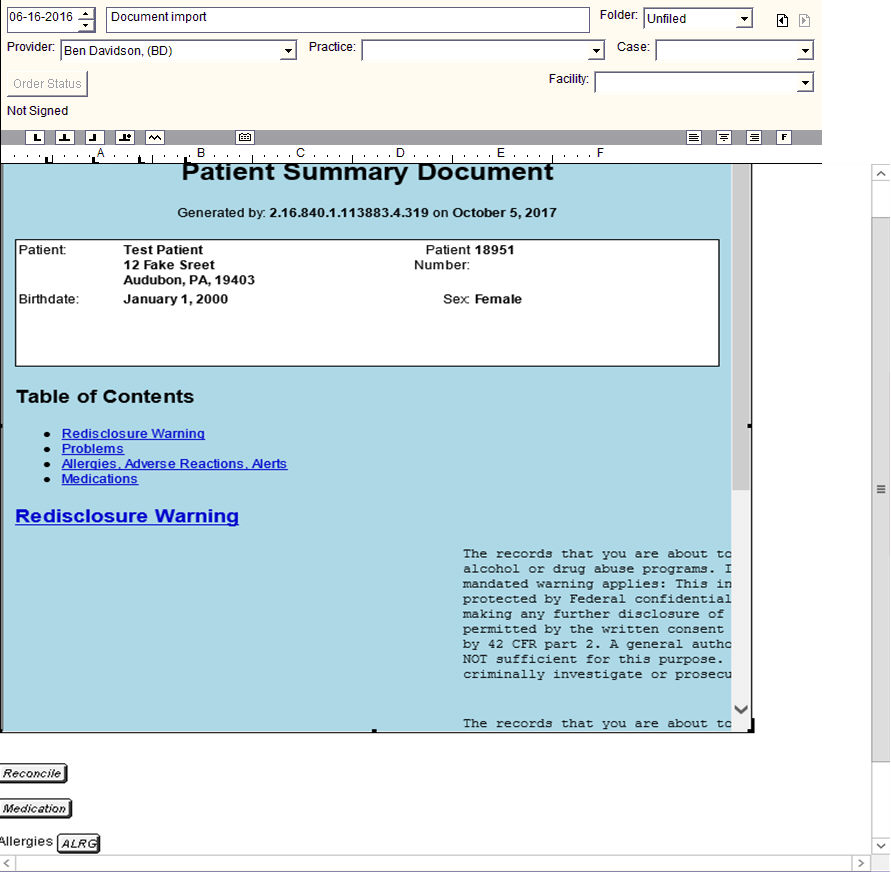
Once downloaded, the imported document will appear
in your To-Do List with a HIE Import Successful subject heading. You can
then double-click this item to open it.

The Summary of
Care document will open in the patient's chart. If the imported
CCDA file contains any allergies, diagnoses, or medications, click the
Reconciliation button.
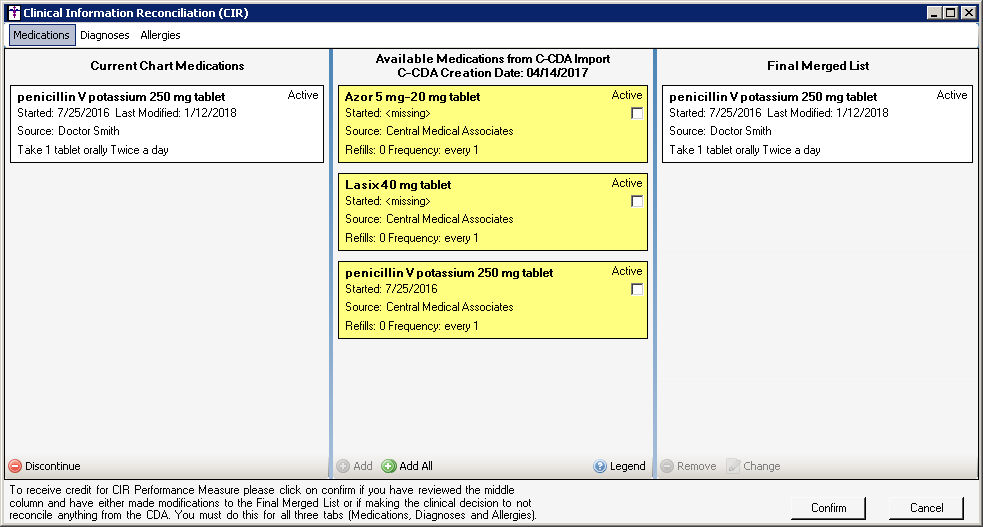
In the Clinical Information Reconciliation dialog
you can view the various Medications, Diagnoses, and Allergies by clicking
the corresponding tab. The allergies, diagnoses, and medications are broken
into the patient’s Current Chart Allergies/Medications, Available Allergies/Medications
from C-CDA Import for the patient, and a Final Merged List. Each list
will show the available allergy (name, start and last modified dates,
and reaction information) and medication (name, start and last modified
dates, and sig information) detail.
Allergies, Diagnoses, and Medications in the Available Allergies/Diagnoses/Medications
from C-CDA Import list are color-coded to denote the level of medication
information available and the ability of importation. You can click the
Legend option for a complete listing.
Allergies, diagnoses, and medications can be moved individually through
by clicking the Add button, or
in bulk using the Add All button.
Each allergy/diagnosis/medication also includes a Skip
checkbox that can be manually selected but will be turned on if the allergy/diagnosis/medication
already exists, has an end date that has passed, or if there isn't enough
information to import the allergy/diagnosis/medication. Allergies, diagnoses,
and medications that have been added will show in the Final Merged List
and labels will be updated to show their status as added.
New medications added to the Final Merged List can be edited by using
the Change button. This will open
the prescribe dialog with as much of the available information found in
the CDA pre-filled. The prescribe dialog will also show the original name,
dates, and text from the import at the bottom.
An added medication can be removed from the list and existing medications
can be discontinued on either the final or current list. If a medication
is discontinued, the discontinue dialog will appear and then the medication
will be marked as ended.
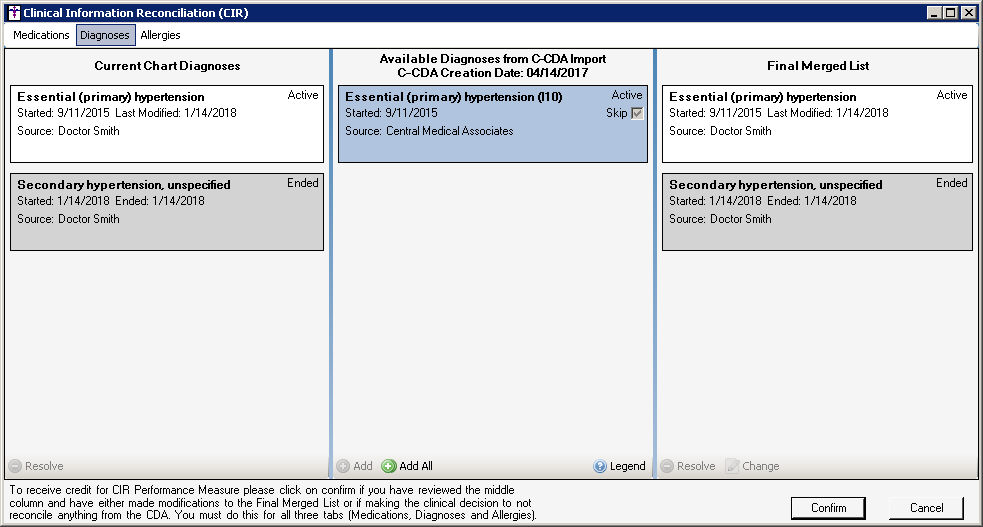
New diagnoses added to the Final Merged List can be edited by using
the Change button. This will open
the Note Diagnosis dialog with as much of the available information found
in the CDA pre-filled.
An added diagnosis can be removed from the list and existing diagnoses
can be resolved on either the final or current list. If a diagnosis is
resolved, the End Diagnosis dialog will appear and then the diagnosis
will be marked as resolved.
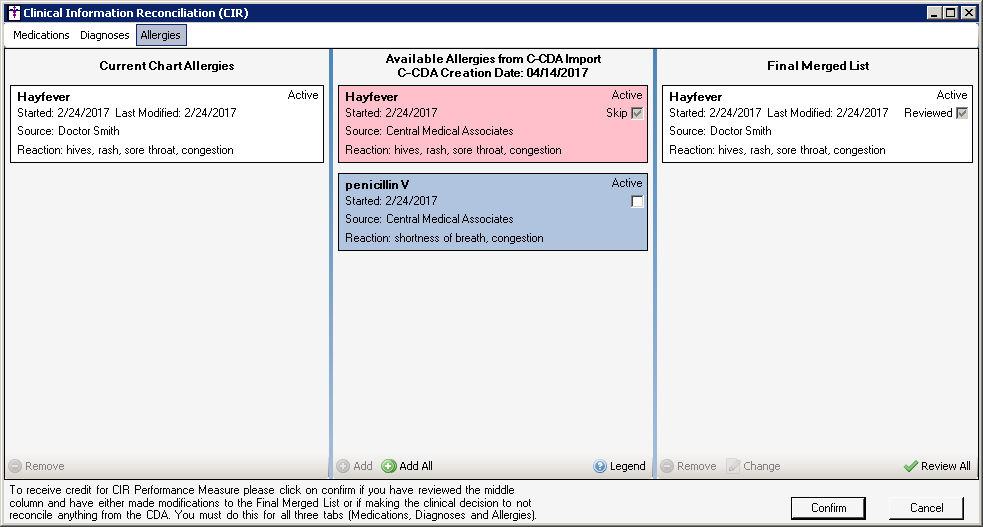
New allergies added to the Final Merged List can be edited by using
the Change button. This will open
the Change Allergy dialog allowing you to modify the reaction text. Likewise,
allergies in the final merged list will have a Reviewed
checkbox so they can be marked as reviewed once confirmed. A Review
All link is added at the bottom to quickly mark all items as reviewed.
An allergy can be removed from the Current Chart Allergies list and
the Final Merged List. If an allergy is removed, a Remove Allergy dialog
will appear allowing you to enter a reason for the removing the allergy.
No changes will be made to a patient's chart until the you click the
Confirm button. If the Cancel
button is clicked, no allergies will be removed or added to the chart,
no medications will be discontinued or added to the chart, and no diagnoses
will be resolved or added to the chart. When confirmed, Clinical will
run through all actions and complete them. All output will appear by the
allergy or the prescribe button, or in the diagnosis checklist, in the
note.
Once all allergies/diagnoses/medications are confirmed and moved into
the patient's chart, drug interactions will be performed on all new allergies
and medications. If a drug interaction happens, and no comment has been
added, the Interactions Present screen will appear showing the interaction
and the name of the drug in the title. You will have the option to add
a comment and proceed, or discontinue the drug.
You can then Add
and Modify Allergy Information
via the Allergy button, Add,
Renew, or Discontinue Medications
as needed via the Prescribe button,
or Add
and Modify Diagnosis Information
via the Diagnosis List.
When finished, click the Save
button or close out of the chart.
Repeat steps 1 - 13 to download any additional documents from the HIE for this patient.