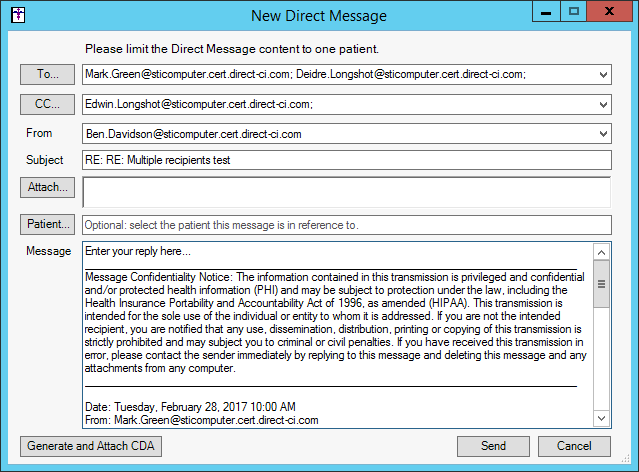
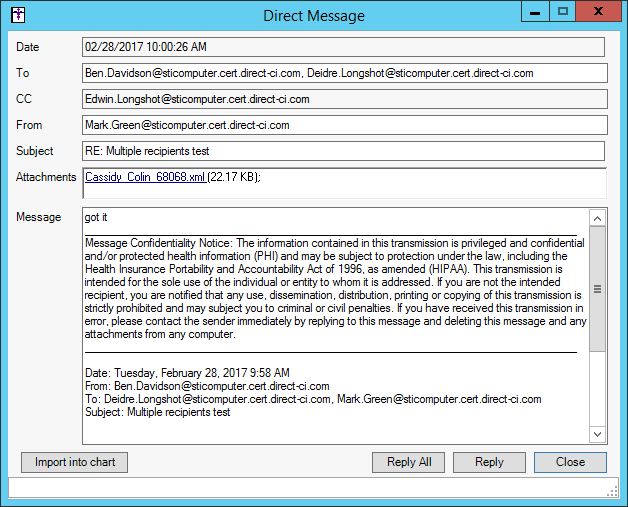
In the To-Do List, double-click the Direct
Message you want to view.
In the Direct Message dialog, the message will
appear, along with the message details, and any attachments. To view an
attachment, left-click the Attachment
in the Attachments field, and then select Open,
Save to My Documents, or Save to Scan Directory.
If you clicked the Open option
the attachment will be opened and you can view the attached document.
If you clicked either of the Save
to options then the attachments will be saved the designated directory.
You can import these files into the patient chart, if needed.
Click the Import
into Chart button to import the message details, CDA files, or
any attachments into the patient's chart.
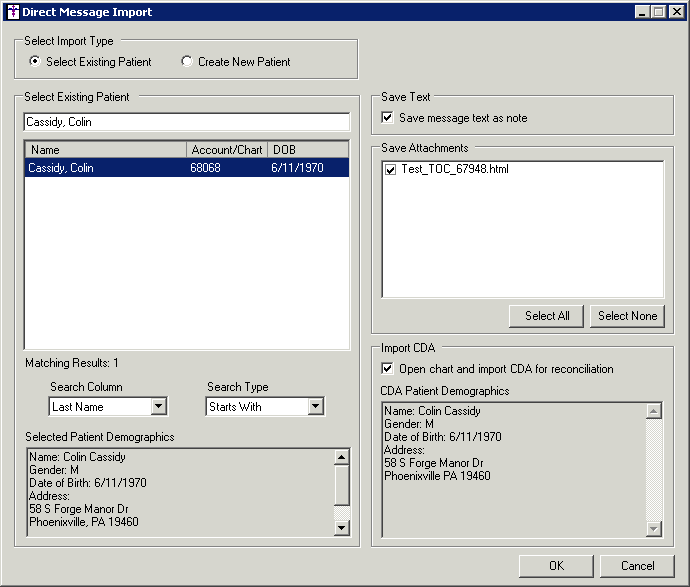
In the Direct Message Import dialog you have the
ability to select the import parameters.
In the Select Import Type, click the Select
Existing Patient option if you are importing information for an
existing patient, or click the Create
New Patient option if you are importing information of a new patient.
In the Select Existing Patient section, search for the patient you
would like to import the information for. If a CDA file was attached,
the patient in that file will default into the Select Existing Patient
field. Once the applicable patient has been located, highlight that patient.
In Save Text section, the Save message
text as note option will be checked. This will save the message
text as a note for the patient. You can uncheck this option if you do
not want the message text saved as a note.
In the Save Attachments section, any files that were attached to the
message will appear. Check any attachments you want to be imported into
the patient's chart.
The Import CDA section will be active if a CDA file was attached to
the message. Check the Open chart and
import CDA for reconciliation option to reconcile the information
in the CDA with what is currently in the patient's chart. Do note, however,
that the information in the patient's chart will be listed in the Selected
Patient Demographics section and can be compared with the CDA Patient
Demographics section which contains the information in the CDA file.
NOTE: If the Create New Patient option was selected, a Create New Patient
section will appear instead of the Select Existing Patient section. In
the Create New Patient section you can select the Practice, enter a Chart
Number, First and Last Name, and a Middle Initial for the patient. The
Save Text, Save Attachments, and Import CDA will also appear in a similar
manner as if selecting an existing patient.
When the import options have been selected as needed, click the OK button.
To reply to the message, click the Reply
button if you want to reply to only the sender of the message, or click
the Reply All button to include
all of the original recipients in the reply. You can then enter any message
text and/or attach a file in a similar manner as when sending a direct
message.