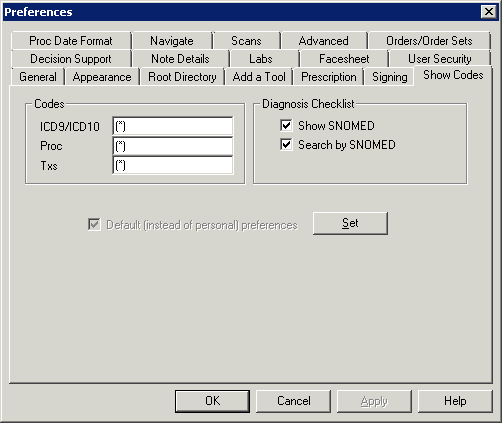
Click Edit >
Preferences.
Click the Show
Codes tab.
In the Codes section, click into the ICD9, Proc,
and Txs fields and enter an asterisk
(*). The asterisk represents the code to be inserted, anything
else in the field will be used to wrap the code itself. For example, a
value of (*) will put the code in parentheses, while [*] will put the
code in brackets.
The ICD9 and Proc codes comes from the Conditions table properties,
and the Txs code comes from the from Test table properties.
In the Diagnosis Checklist section, check the
Show SNOMED option and/or the
Search by SNOMED option, as needed.
The Diagnosis Checklist preferences are user-based and will default based
on the user configuring these options.
When the Show SNOMED option is checked, this option will be checked
in lower left of the Diagnosis Checklist when a Diagnosis Checklist is
opened, and any SNOMED codes attached to a diagnosis code will appear
below the diagnosis.
When the Search by SNOMED option is checked, this option will be checked
in lower left of the Diagnosis Checklist when a Diagnosis Checklist is
opened. When
in the Search by SNOMED option is checked in the Diagnosis Checklist,
when you click the Search/Add Diagnosis button, the Diagnosis Search dialog
will default to the SNOMED tab. Likewise, when the Search by SNOMED option
is checked in the Show Codes tab, whenever you access the Diagnosis Search
dialog via System Tables > Diagnosis Search, or via the Template Editor
by clicking the Search/Add Diagnosis button in the Diagnosis dialog when
adding or editing the diagnosis checklist for a template, the Diagnosis
Search dialog will default to the SNOMED tab.
These default options can be overridden within the Diagnosis Checklist.
When finished, click the Set
button.
Click the OK
button when done.
