Click Edit >
Preferences.
Click the General
tab.
In the Prescriptions field, select the Printer
you would like to use for printing prescriptions.

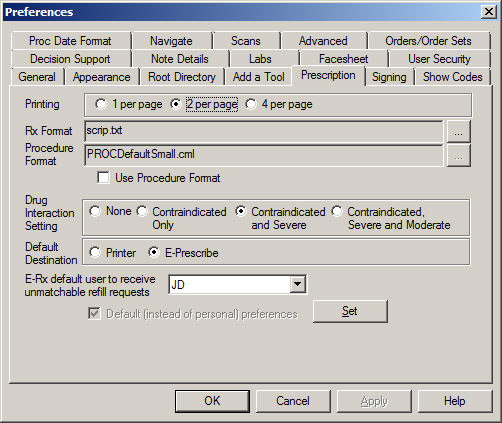
Click the Prescription
tab.
In the Printing section, select the Number
of Prescriptions you want to print per page.
In the Rx Format field, browse to the Prescription
Format. The
format is used for printing medical prescriptions and will be based on
your state and the type of prescription paper you are using.
In the Procedure Format field, the PROCDefaultSmall.cml
file will appear. This field cannot be modified. If the Use
Procedure Format option is selected, the system will use the legacy
PROCDefaultSmall.cml format when printing procedure orders. If the Use Procedure Format option is not selected,
the system will use the default format when printing procedure orders.
In the Drug Interaction Setting field, click the
None, Contraindicated
Only, Contraindicated and Severe,
or Contraindicated, Severe and Moderate
radio button for the level of drug interaction warnings you would like
displayed.
In the Default Destination field, click the Printer or E-Prescribe
radio button to select a default method in which the prescriptions will
be printed or sent. This setting can be overridden on an individual basis
by selecting a different method via the patient's face sheet when printing/sending
a prescription.
NOTE: The Rx Format, Use Procedure Format, Drug
Interaction Setting, and Default
Destination preferences are user-specific settings and will be
based upon whichever user is currently logged onto the system when the
change to the preference is made.
In the E-Rx default user to receive unmatchable
refill requests field, select the appropriate User.
Click the Set button.
When finished, click the OK
button.