The following is an example of how to edit a ChartMaker®
Clinical Prescription Layout file (*.CML). In this example, a Boolean
field is added to the Layout file and text is inserted into the prescription
depending on the value of the Substitutions OK field which is set when
the provider prescribes a medication. Text will then appear on the NJScrip.CML
showing either "Dispense as Written" or "Substitutions
Permissible."
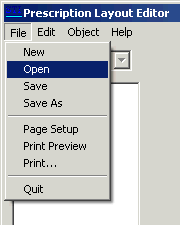
Use the following steps to load the layout for a prescription you want
to edit.
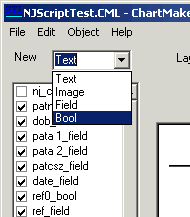
Use the following steps to add a Boolean field to the Prescription Layout
File that you just opened. After this field is added, the boolean field
will changed based on Yes/No questions regarding the prescription.
To add a Boolean field, click the New
drop-down box, and then select Bool
for Boolean.
The Boolean Item Form dialog will appear. Enter
the field Width and Height
(A) and the Offsets from the top
and the left of the layout (B).
Select the Boolean field to be displayed from
the drop-down box (C), in this case ASIS,
meaning "Dispense as Written."
In the True Text field, enter the Text
to be displayed when the Boolean field is true, and then in the False
Text field, enter the Text to
be displayed when the Boolean field is false (D). In the example, when
the provider prescribes a medication with the "Substitutions OK"
checkbox checked ON, then the ASIS Boolean is false, and the false text,
"Substitutions Permissible," will be displayed. When
the provider prescribes a medication with the "Substitutions OK"
checkbox OFF, then the ASIS Boolean is true, and the true text, "Dispense
as Written," will be displayed.
Select the text justification Left,
Right or Center
(E), and
then adjust the text Font attributes
(F).
When finished, click on the Add/Update
button (G) to commit the changes.