To access the MIPS Dashboard, click Reports
> MIPS Dashboard.
In the MIPS Dashboard, select the Configuration
you want to use when configuring and running MIPS information in the corresponding
field. A configuration needs to be selected before the Quality, Advancing
Care Information, and Improvement Activities categories will be accessible
allowing you to select various parameters for those categories, as well
as calculate scores based on the parameters set and your data entered
to date.
Configurations can be added by clicking the Add
button to the right of this field. Likewise, you can edit and delete a
configuration by selecting the desired Configuration,
and then clicking the Edit or
Delete button to the right.
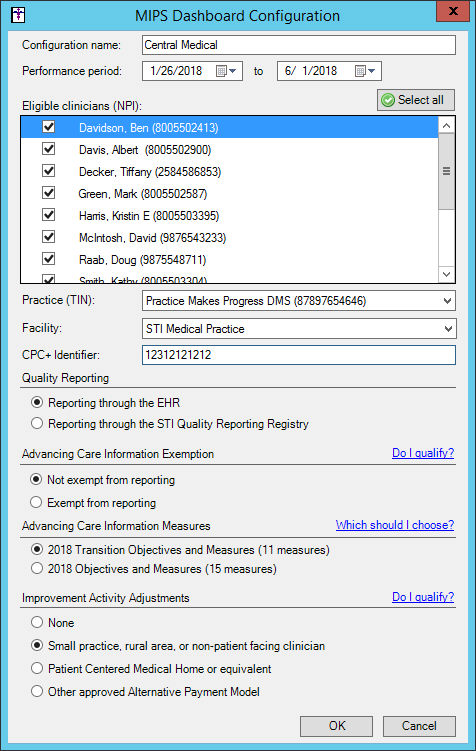
When adding or editing a configuration, the MIPS
Dashboard Configuration dialog will appear allowing you to add or modify
the configuration information. Add or modify the Configuration
name, as needed, in the corresponding field.
Next select Performance
period in the corresponding date fields. The performance period
needs to be between 90 days and one full year. Also, when configuring
the dates for the performance period, the period configured cannot span
different years.
In the Eligible clinicians (NPI) field, select
the Eligible Clinicians you want
to include in the configuration. Do note, that either a single clinician
or all of the eligible clinicians in the practice needs to be selected.
In the Practice (TIN) field, select the optional
Practice Tax ID Number you would
like to further filter the selected measures in the MIPS Dashboard, if
applicable. When a Practice TIN is selected, it will be used as a filter
on all applicable measures, for the selected Eligible Clinicians, and
will appear in the in the header when printing.
In the Facility field, select the optional Facility you would like to further filter
the selected measures in the MIPS Dashboard, if applicable. When a Facility
is selected, it will be used as a filter on all applicable measures, for
the selected Eligible Clinicians, and will appear in the in the header
when printing.
In the CPC+ Identifier field, enter your Practice Site Location Identifier for
the CPC+ incentive program, if applicable. When a CPC+ Identifier is entered,
it will be included in any QRDA files generated from the MIPS Dashboard,
and will be used for validating your QRDA files for the CPC+ incentive
program.
In the Quality Reporting section, select the Reporting through the EHR or the Reporting through the STI Quality Reporting
Registry option, as applicable.
In the Advancing Care Information Exemption section,
select the Not exempt from reporting
or the Exempt from reporting option,
as applicable. Click the corresponding Do
I qualify? link to view further information regarding exemptions
for ACI reporting.
NOTE: By default, Quality Reporting is weighted as 60%, Advancing Care
Information (ACI) as 25%, and Improvement Activity (IA) is 15%. If a user
is configured to be exempt from reporting for ACI, the Quality category
will be weighted as 85% and ACI will be 0% and disabled.
When the Performance period is for 2018, an Advancing
Care Information Measures section will appear. Select the 2018
Transition Objectives and Measures (11 measures) or the 2018
Objective and Measures (15 measures) option, as applicable. Click
the corresponding Which should I choose?
link to view further information on which option is right for your situation.
The objectives and measures reflected in the Advancing Care Information
dialog will be dependent on the choice selected in the MIPS Dashboard
Configuration dialog for the 2018 performance period.
In the Improvement Activity Adjustments section,
select the None, Small practice, rural
area, or non-patient facing clinician, Patient Centered Medical Home or
equivalent, or Other approved Alternative Payment Model option,
as applicable. Click the corresponding Do
I qualify? link to view further information regarding the options
for IA reporting.
When finished setting the parameters for the configuration
you are adding or modifying, click the OK
button.
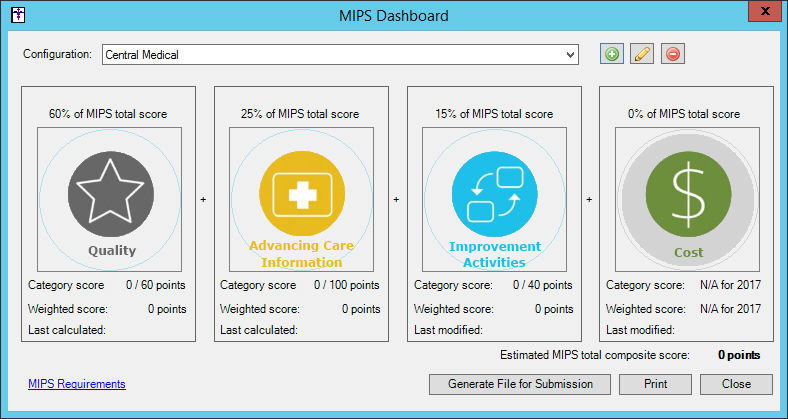
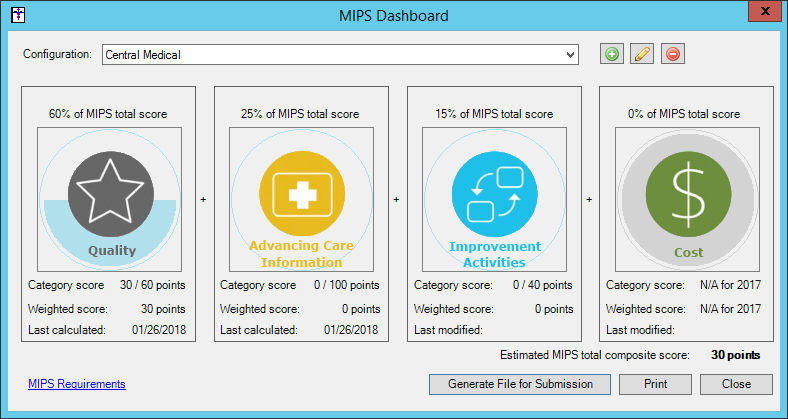
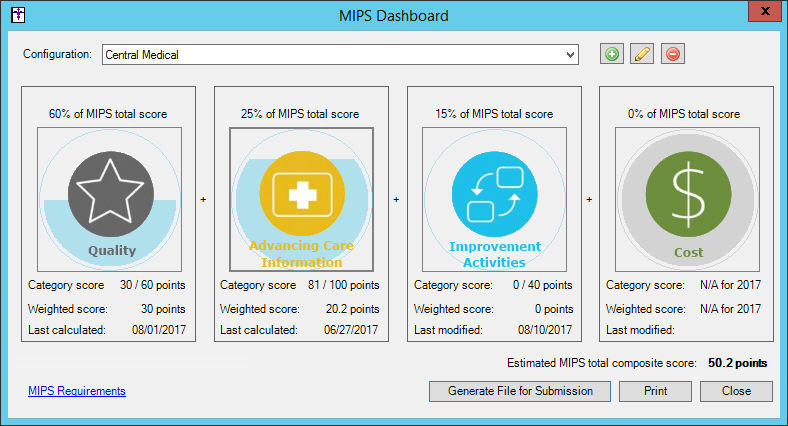
After a Configuration is set up and/or selected,
you will have access to each of the categories (Quality,
Advancing Care Information, and
Improvement Activities) to select
various parameters for those categories, as well as calculate scores based
on the parameters set and your data entered to date. Each of the categories
will show the percentage of the MIPS total score as well as have a last
calculated/modified date so you will easily know if you need to run these
again.
Click the MIPS Requirements
link to view the requirements for each of the categories of the MIPS program.
In the MIPS Category Requirements dialog you can view the requirements,
and then click the Print button
to print a hard copy of the requirements, or click the Close
button to exit the dialog.
If you selected the Reporting
through the EHR option in the Quality Measure section of the MIPS
Configuration Dashboard dialog for the selected configuration, click the
Quality button to access the Quality
Measures dialog where you can select the quality measures for your performance
period, calculate your estimated score, run a reconciliation report, and
generate a file for submission.
In the left pane of the Quality Measures dialog,
the existing 29 quality measures will be listed, categorized under the
headings Outcome Measures, High Priority Measures, and Other
Measures. You must pick at least 6 measures, however, you can select
as many measures as desired, but at least one Outcome or High Priority
measure must be selected. Select the Quality
Measures that you would like to report for the performance period.
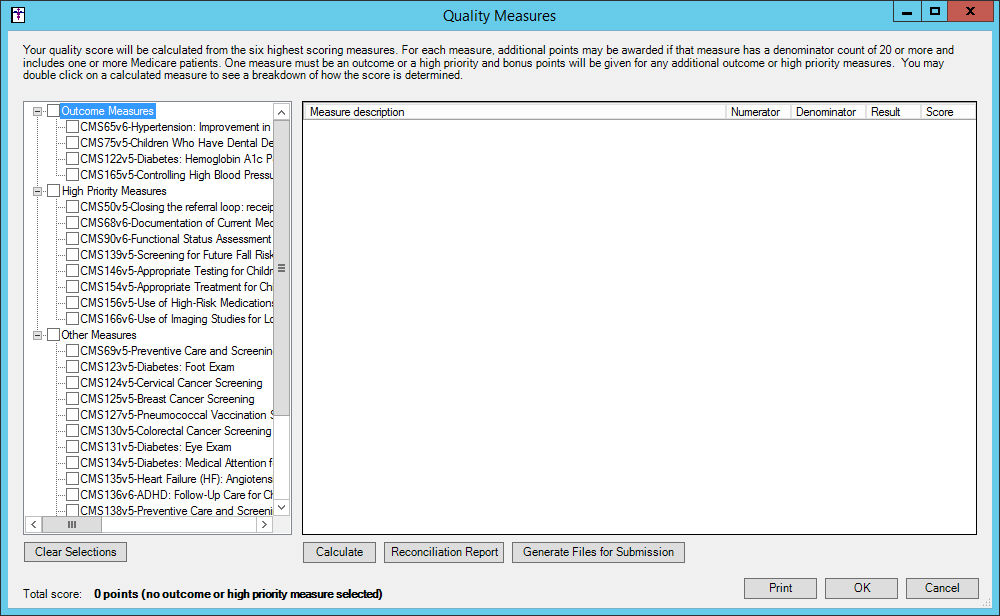
The selected measures will appear in the right
pane as a single row for each selected measure. Once the applicable measures
are selected, you can calculate your estimated score by clicking the Calculate button.
After the system is done collecting and running
data for the performance period, a Total
score will appear at the bottom. If the total score is greater
than 60, a warning text will appear indicating that the final score is
capped.
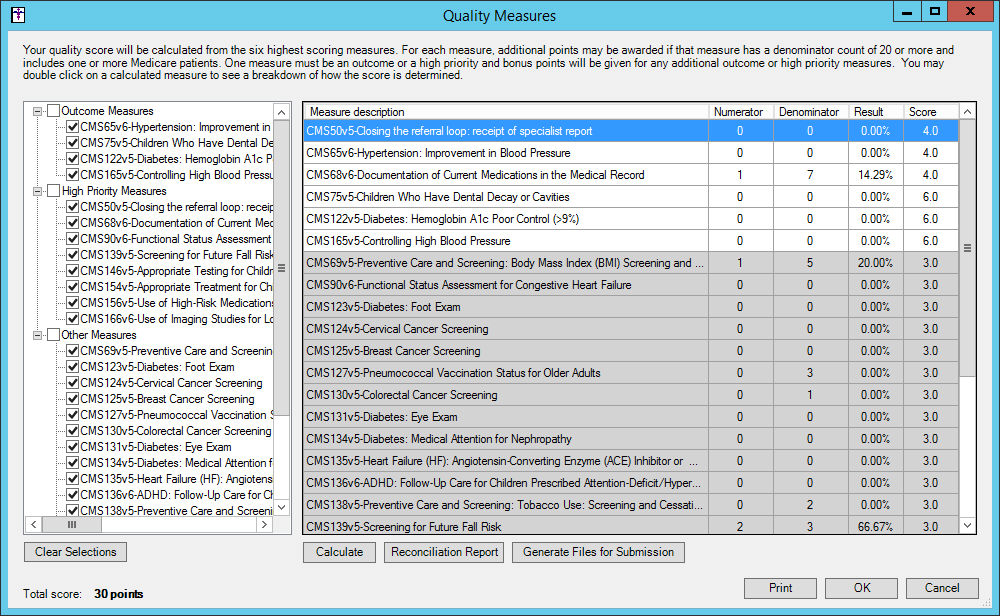
When calculating quality measure scores, the standard Numerator and
Denominator information will be displayed along with a percentage result
and a final score. The score starts as a base 3 points for all measures.
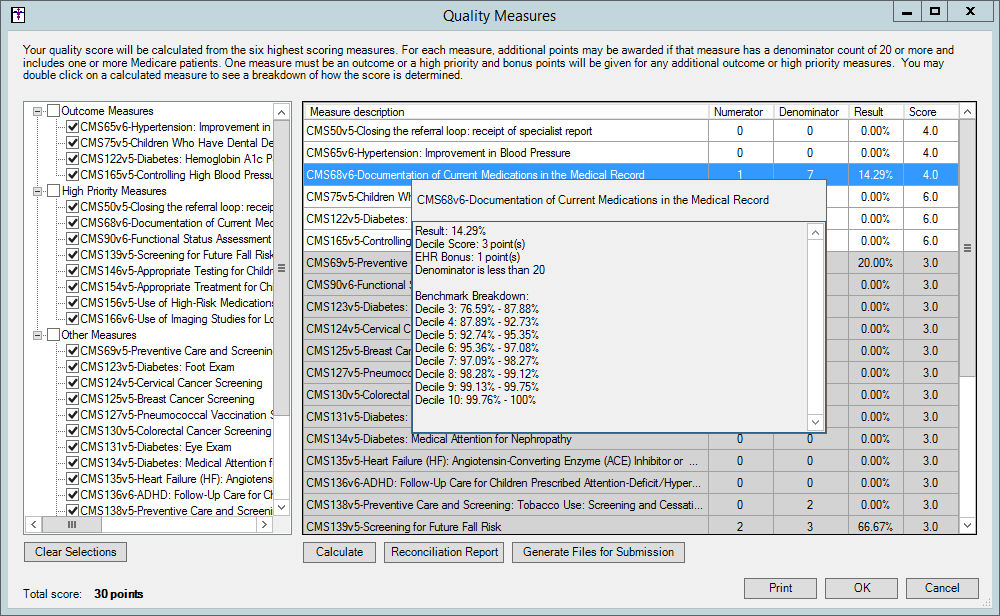
If the measure has 20 or more in the denominator and at least 1 patient
is marked as having Medicare as an insurance during an encounter, the
measure is eligible for additional benchmark points. Benchmark points
are determined by information provided by CMS, however, not all quality
measures have a benchmark. Double clicking a row within the grid will
display the benchmark breakdown and bonus points if they exist.
Only the top 6 best performing measures will be counted in the score,
if more than 6 measures are calculated. Measures that are not included
in the score will be marked with a gray background and reordered to the
bottom of the grid. The top 6 measures are then eligible for 1 additional
bonus point each for submitting through an EHR (for a maximum of 6 points).
One outcome or high priority measure is required, however for each additional
outcome 2 bonus points are awarded and 1 for each additional high priority
measure (for a maximum of 6 points). Double clicking a row within a grid
will also show the bonus points awarded.
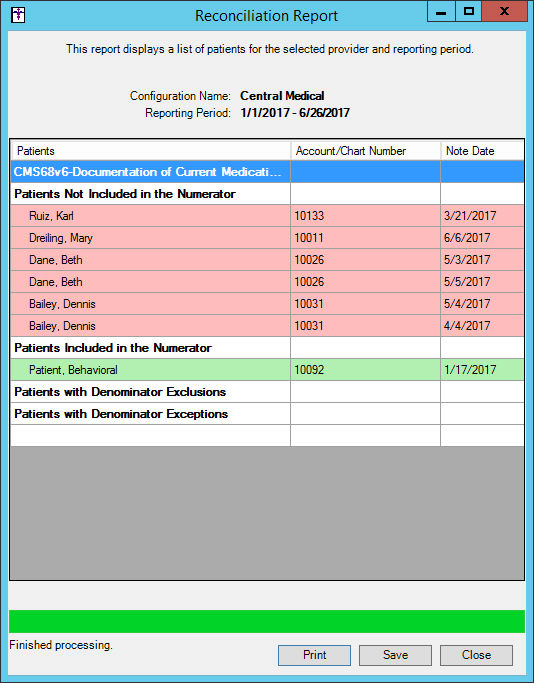
After the total score has been calculated you
can run a reconciliation report for a selected measure by highlighting
the measure you wish to run the report for, and then clicking the Reconciliation Report button.
A Reconciliation Report dialog will appear displaying a list of applicable
patients for the selected performance measure. Click the Print
button to print this report. Click the Save
button to save this report as a text file to a MIPSReconReports directory
on your local machine.
NOTE: When saving reconciliation reports you can modify the location
where report files are stored. The My Documents\MIPSReconReports directory
defaults if no alternative location is selected.
When finished, click the Close
button.
To generate a QRDA Category 3 file for submission,
click the Generate Files for Submission
button.
NOTE: When generating files for submission, a QRDA file will be generated
that will include all measures that are selected, not just the 6 top performing
measures. Likewise, any Advancing Care Information and Improvement Activity
data will also be included in the file.
A Generate Category 3 QRDA Files dialog will appear warning you that
it may take a significant amount of time and resources to generate the
files for submission. Click the OK
button to continue.

Once the warning has been satisfied, a Generate File for Submission
dialog will appear, select which incentive program you are creating the
file for: MIPS Individual, MIPS Group, or CPC+.
After the applicable program has been selected, click the
OK button.
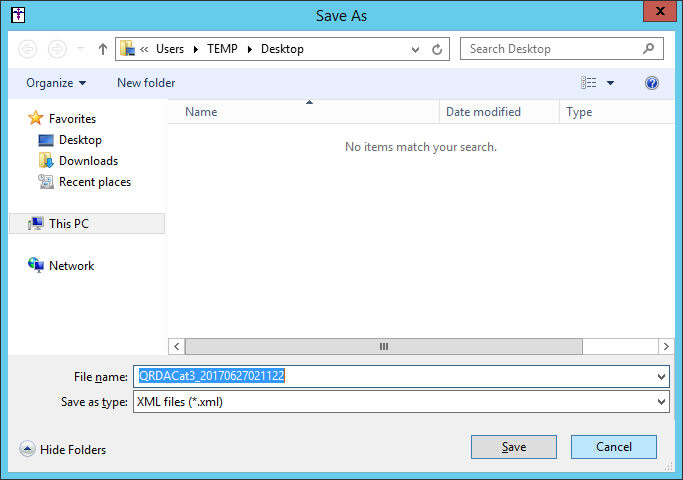
A Save As dialog will appear allowing you to select the file location
for the file. After the location has been selected, and the File
name modified as needed, click the Save
button. The system will then calculate the measures, and then a message
will appear after the file has been generated in the selected location.
Click the Print
button to print the information generated in the Quality Measures dialog.
When printing, the printed document will include a header at the top
that will contain the Configuration name, Eligible clinicians (with NPI),
and Performance period. Likewise, the printed document will contain all
selected measures, and data from the grid. Measures that are not included
in the category score, and appear in gray in the Quality Measures dialog,
will be separated and have a heading to denote that they are not included
in the score. Additionally, the document will contain the raw category
score and the final weighted score.
When finished selecting measures, calculating
scores, running reconciliation reports, generating files for submission,
and/or printing results in the Quality Measures dialog, click the OK button to save the selected quality
measures and maintain any scores. The system will then update the main
dashboard view with the Category score and the Weighted score, as well
as update the Estimated MIPS total composite score.
If you selected the Reporting
through the STI Quality Reporting Registry option in the Quality
Measure section of the MIPS Configuration Dashboard dialog for the selected
configuration, click the Quality
button to access the Quality Score dialog that allows you to manually
enter the Quality score from the
registry. When finished, click the OK
button.
Click the Advancing
Care Information button to access the Advancing Care Information
dialog where you can select the Advancing Care Information (ACI) options
for your performance period, calculate your estimated Base Score, Performance
Score, and Bonus Points, run a reconciliation report for your Performance
Score, and Print your Performance Score information.
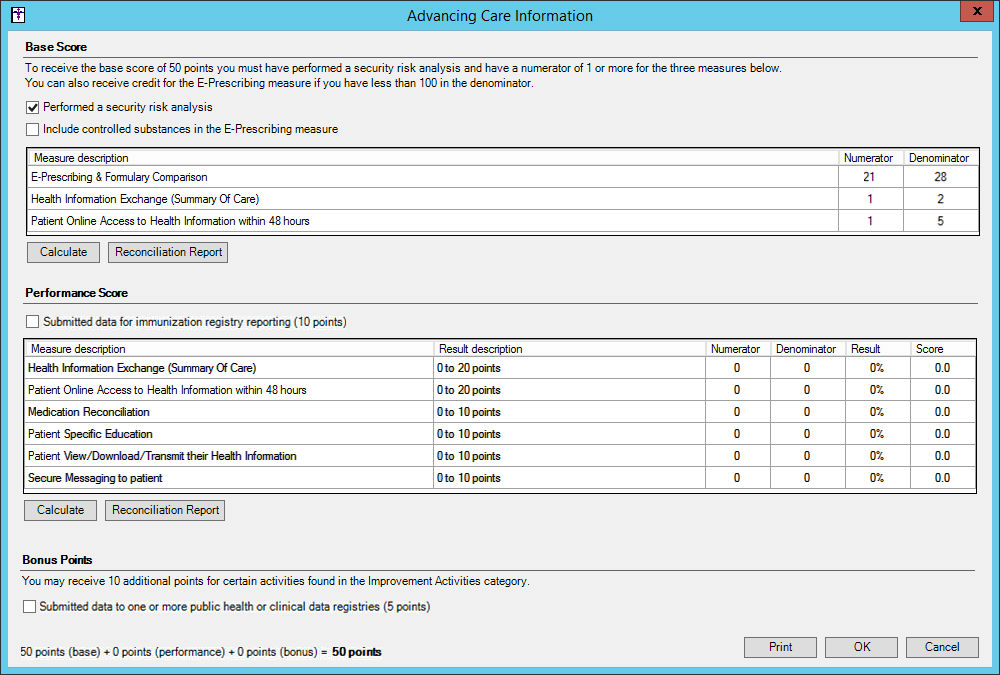
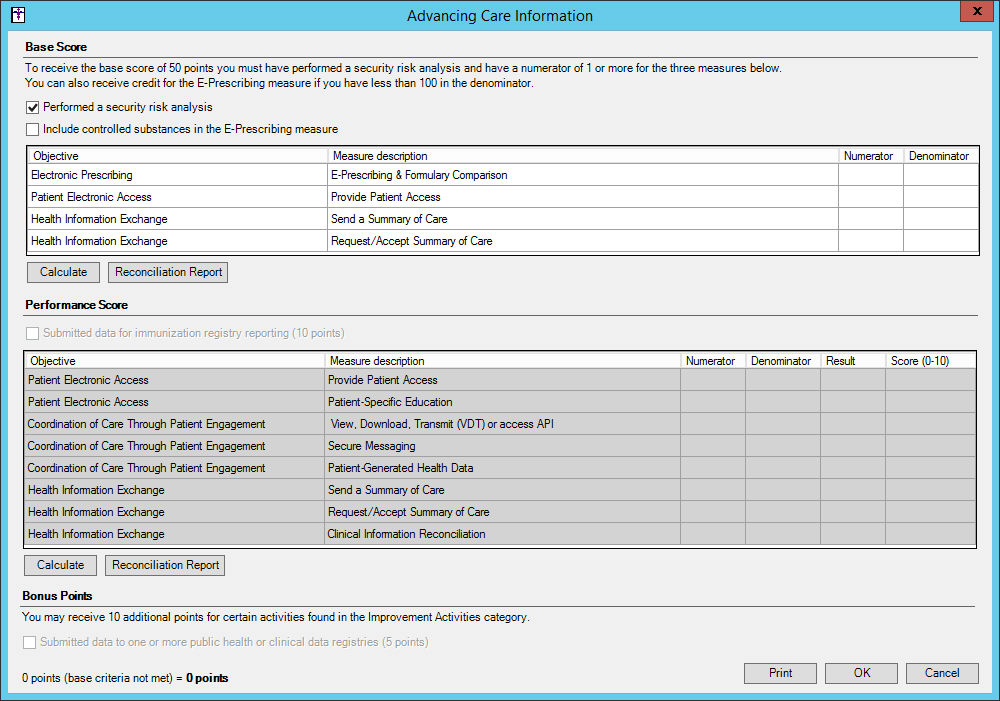
The Advancing Care Information dialog is broken
up into three areas for Base Score, Performance Score, and Bonus Points.
The Base Score must
be completed before any other section of the ACI will count. Performance
and Bonus sections will automatically be in a disabled state (although
measures can be calculated but will show as gray rows and their score
will not be added to the total) if Base Score credit is not awarded, and
warning text will appear at the bottom to indicate that base credit was
not met.
NOTE: If your performance period is in 2018 the performance measures
for the Base Score and Performance Score sections will contain either
the 2018 Transition Objective and Measures or the 2018 Objectives and
Measures depending upon option selected in the MIPS Dashboard Configuration
dialog (see step 10 above). See the figures below in this step for Advancing
Care Information dialog when each of these options is selected.
In the Base Score section, check the Performed
a security risk analysis option, then check the optional Include controlled substances in the E-Prescribing
measure option, if applicable, and then click the Calculate
button. If the Base Score credit is awarded, and the conditions are met
(getting a 1 in the numerator after calculating the 3 base performance
measures), the Performance Score and Bonus Points sections will be enabled.
NOTE: As an exemption, a user with less than 100 in the denominator
for E-Prescribing will count even if they do not have at least 1 in the
numerator.
2017/2018 Transition Objectives and Measures:
2018 Objectives and Measures:
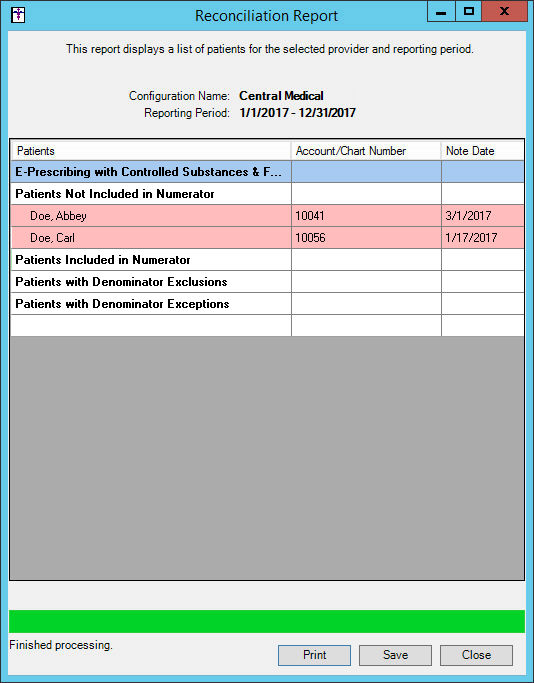
After the base score has been calculated you can
run a reconciliation report for a selected measure by highlighting the
measure you wish to run the report for, and then clicking the corresponding
Reconciliation Report button.
A Reconciliation Report dialog will appear displaying a list of applicable
patients for the selected performance measure. Click the Print
button to print this report. Click the Save
button to save this report as a text file to a MIPSReconReports directory
on your local machine.
NOTE: When saving reconciliation reports you can modify the location
where report files are stored. The My Documents\MIPSReconReports directory
defaults if no alternative location is selected.
When finished, click the Close
button.
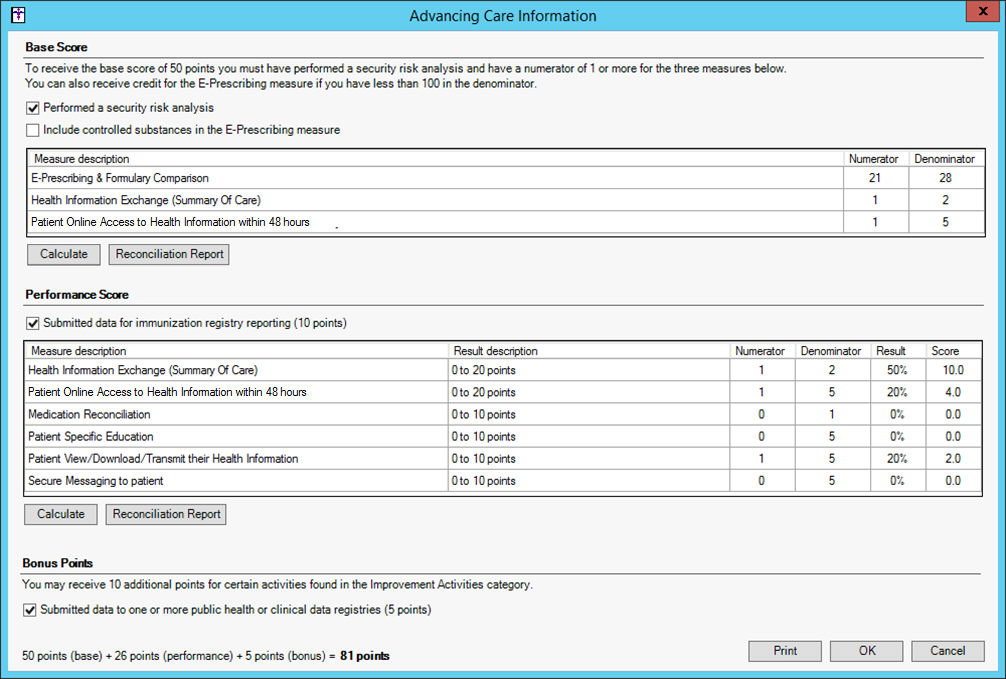
In the Performance Score section, check the Submitted data for immunization registry reporting
option, if applicable. This indicates that you have submitted data to
an immunization registry and is worth 10 points.
In addition, 6 (for 2017) or 8 (for 2018) measures can be calculated
for an additional 0 to 10 points each, two of which are worth double points
(for 2017), where scoring is based on the performance percentage per CMS
requirements and guidelines. Click the Calculate
button to calculate your estimated score for these performance measures,
and after the system is done collecting and running data for the performance
period, the results and applicable scores will appear in the corresponding
columns in the grid.

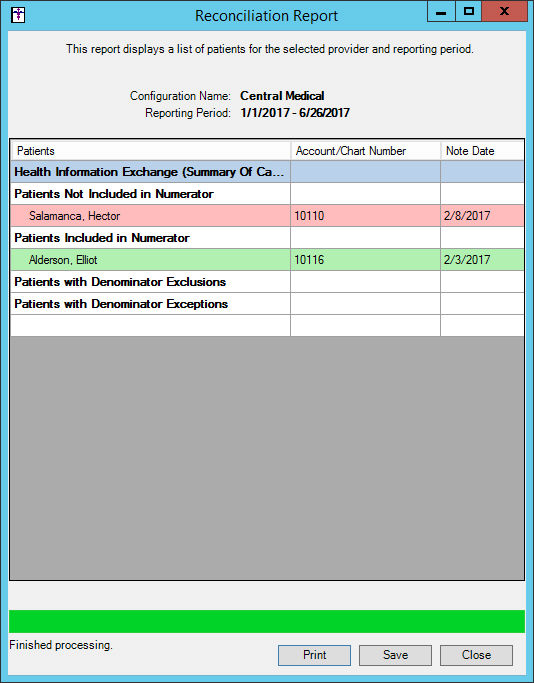
After the performance score has been calculated
you can run a reconciliation report for a selected measure by highlighting
the measure you wish to run the report for, and then clicking the Reconciliation Report button.
A Reconciliation Report dialog will appear displaying a list of applicable
patients for the selected performance measure. Click the Print
button to print this report. Click the Save
button to save this report as a text file to a MIPSReconReports directory
on your local machine.
NOTE: When saving reconciliation reports you can modify the location
where report files are stored. The My Documents\MIPSReconReports directory
defaults if no alternative location is selected.
When finished, click the Close
button.
In the Bonus Points section, check the Submitted
data to one or more public health or clinical data registries option,
if applicable. This
indicates that you have submitted data to a public health or clinical
data registry and is worth 5 points. Likewise, you may also receive 10
points by making any selection in the ACI Bonus tab of the Improvement
Activities dialog.
The final score (points) is listed at the bottom
as a breakdown of Base Score plus the Performance Score plus any Bonus
Points. Click the Print button
to print the information generated in the Advancing Care Information dialog.
When printing, the printed document will include a header at the top
that will contain the Configuration name, Eligible clinicians (with NPI),
and Performance period. Likewise, the printed document will include Yes/No
answers for the security analysis, controlled substances, immunization
registry, and other public health or clinical data registry selections;
and will be separated into Base Score, Performance Score, and Bonus Score
sections like the Advancing Care Information dialog. Both the Base Score
measures and Performance Score measures will appear in the printed document
along with their numeric results. Additionally, the document will contain
the raw category score and the final weighted score.
Click the OK
button to save any calculated scores and selections. The system will then
update the main dashboard view with the Category score and the Weighted
score, as well as update the Estimated MIPS total composite score.
Click the Improvement
Activities button to access the Improvement Activities dialog where
you can select any improvement activities that you qualify for during
your performance period.
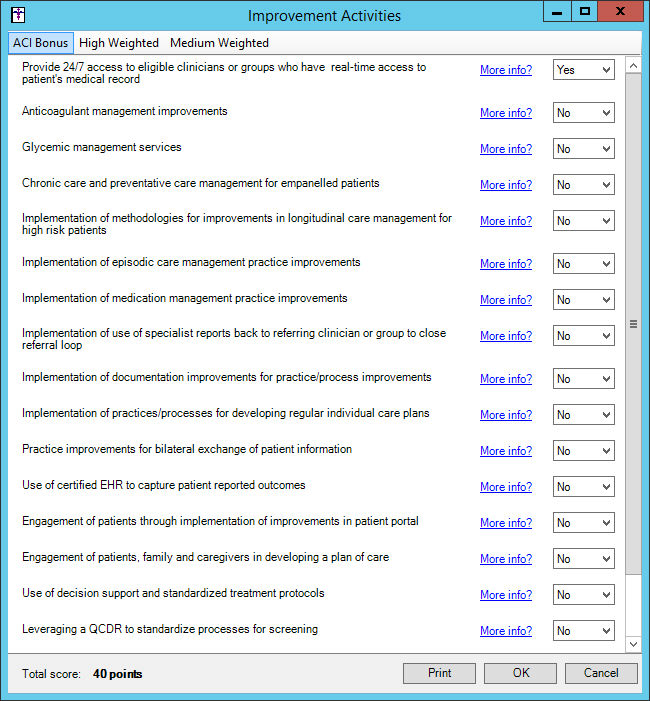
The Improvement Activities dialog is broken into
three tabs: ACI Bonus, High
Weighted, and Medium Weighted
activities. Each tab will display the applicable list of activities with
a link for More Information and
a Yes/No selection drop-down box.
High Priority activities are worth 20 points and medium weight are worth
10 points.
If you chose the Small practice, rural
area, or non-patient facing clinician option in the Improvement
Activity Adjustments section of the MIPS Dashboard Configuration dialog,
you will receive double points for each selection. If you selected the
Patient Centered Medical Home or equivalent
option, you will receive full credit automatically (40 points), but can
still make other choices. If you selected the Other
approved Alternative Payment Model, you will receive half credit
(20 points) automatically.
If you make any selection from the ACI Bonus section, 10 points will
be given to the ACI total.
Select the ACI Bonus, High Weighted, or Medium
Weighted tab, and then in the list of improvement activities, select
Yes for any applicable activity.
Click the corresponding More Information
links as needed. You can then repeat this process for each tab.
When finished, the Total
score (capped at 40 points) is listed at the bottom. Click the
Print button to print the information
generated in the Improvement Activities dialog.
When printing, the printed document will include a header at the top
that will contain the Configuration name, Eligible clinicians (with NPI),
and Performance period, as well as the option selected, other than None,
for the Improvement Activity Adjustments in the MIPS Dashboard Configuration
dialog. The printed document will include only the Yes answered activities
with their corresponding weight, as well as whether they apply the ACI
bonus. Additionally, the document will contain the raw category score
and the final weighted score.
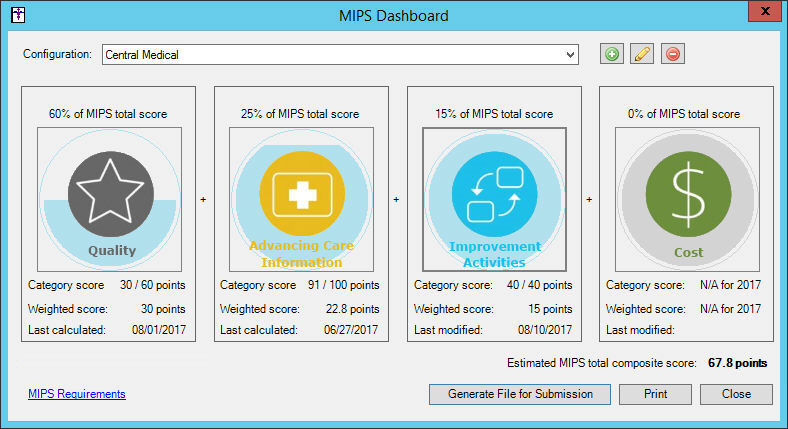
Click the OK
button to save any selections and scores. The system will then update
the main dashboard view with the Category score and the Weighted score,
as well as update the Estimated MIPS total composite score.
In the MIPS Dashboard, click the Print
button if you would like to print all categories.
When this document is printed from this area, only one header section
will appear. Each category's weighted score will be shown with the total
estimated MIPS score. Likewise, the printed document will also include
all category printouts. If the STI Quality Reporting Registry option is
selected for the Quality Reporting section of the MIPS Dashboard Configuration
dialog, the Quality section will not be printed and the configuration
option will be printed in the header. Similarly, if you are configured
to be exempt from reporting ACI, the section will not print and a line
will appear in the header with the configuration.
In the MIPS Dashboard, click the Generate
Files for Submission button, if you want to create a QRDA Category
3 file to submit for MIPS or CPC+ incentive programs.
NOTE: When generating files for submission, a QRDA file will be generated
that will include all measures that are selected, not just the 6 top performing
measures. Likewise, any Advancing Care Information and Improvement Activity
data will also be included in the file.
After the Generate File for Submission button has been clicked, a variety
warning messages may appear depending upon the status of your MIPS process.
Some of these messages not allow you to continue (i.e., if the Quality
section has not been calculated or is incomplete, or if you are using
configured the STI Quality Reporting Registry option for Quality Measures
in the MIPS Dashboard Configuration dialog), while other will prompt you
to confirm that you want to continue (i.e., if you have not calculated
for Quality and/or Advancing Care Information in over a day).
Once the warnings has been satisfied, a Generate File for Submission
dialog will appear, select which incentive program you are creating the
file for: MIPS Individual, MIPS Group, or CPC+.
After the applicable program has been selected, click the
OK button.
A Save As dialog will appear allowing you to select the file location
for the file. After the location has been selected, and the File
name modified as needed, click the Save
button. The system will then generate the file and a message will appear
after the file has been generated in the selected location.
When finished using the MIPS Dashboard, click the Close button.