In the Shot Room Automation dialog, locate and
double-click the patient you want to create a new order for.
Once the in the patient's shot room flow sheet,
click the Orders button.

In the Shot Order screen, if you are in view mode
the patient's previous shot order will appear, and you will need to click
the New Order button to create
a new order for the patient. This will change the Shot Order screen to
edit mode and their previous order will be listed in the Previous Order
section. If a patient has not had a previous shot order, you will default
to the edit mode.
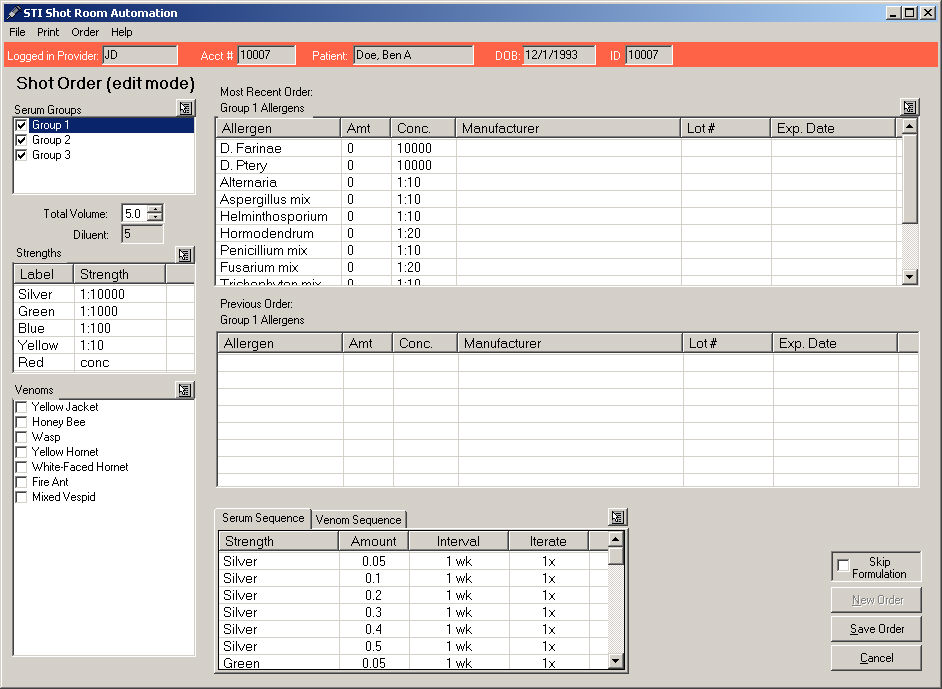
In the Serum Groups section, check the applicable
Serum Group(s) you want to include
in the patient's shot order.
Each serum group will allow you to specify the types of allergens along
with the specific amount, concentration, manufacturer, lot number, and
expiration as needed for that particular serum. These allergens are typically
combined into three separate groups which come defaulted into the system.
Likewise, each group of allergens typically comprises one serum vial.
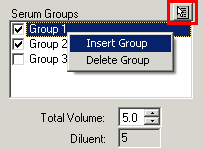
You also have the ability to insert and delete groups as needed, by
right-clicking in the Serum Group field, and then selecting Insert Group/Delete
Group; or by clicking the Serum Group button, and then selecting Insert
Group/Delete Group.
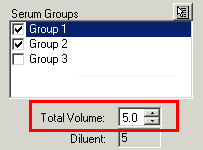
Next, select the Total
Volume for the Serum Groups, as needed. Serum groups will have
the same volume. The default volume is 5.0 cc’s. The volume can be adjusted
up or down by clicking on the Up arrow or Down arrow next to the volume
display numeric. The adjustment increments are 0.5 cc’s.
NOTE: If a serum is ordered to be 5.0 cc’s and the component allergens
do not add up to 5.0 cc’s, then an additional non-active component, Diluent,
is added to the group so that the resulting volume will be the correct
prescribed volume. When the allergen amounts are added, the system will
automatically configure the amount of Diluent needed for the serum in
the Diluent field below.
Once the Serum Groups and Total Volume has been
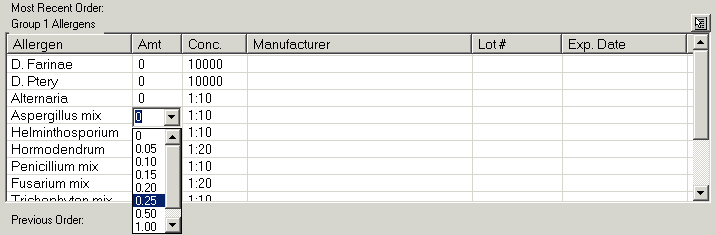
configured as needed, highlight a specific Serum Group, and in the Most
Recent Order section to the right, that Group's default allergens will
populate. Here you can select the specific Amount (Amt), Concentration
(Conc.), Manufacturer, Lot #, and Expiration Date for the allergens to
be included in the selected Group. To modify the values simply click into
the corresponding field and select and/or enter the proper value.
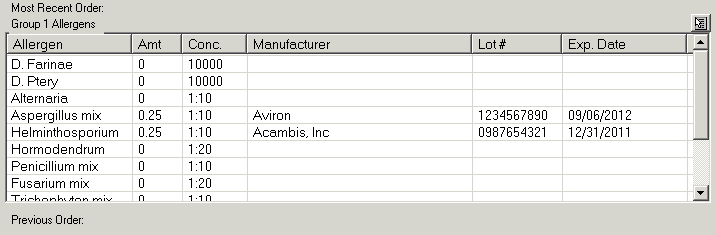
For our example, we have chose to include in Group 1 Allergens: Aspergillus
mix, with an Amount of 0.25 cc's, 1:10 concentration, Aviron for the Manufacturer,
1234567890 for the Lot #, and 09/06/2012 for the expiration date; and
Helminthosporium, with an Amount of 0.25 cc's, 1:10 concentration, Acambis,
Inc. for the Manufacturer, 0987654321 for the Lot #, and 12/31/2011 for
the expiration date.
You also have the ability to insert and delete allergens, as well as
clearing all allergens as needed, by right-clicking in the Allergen grid,
and then selecting Clear Allergens/Insert Allergen/Delete Allergen; or
by clicking the Group Allergens button, and then selecting Clear Allergens/Insert
Allergen/Delete Allergen.
Repeat this step until all applicable allergens are configured for
the selected group.
Repeat step 6 for any other groups that need to
be included in the shot order.
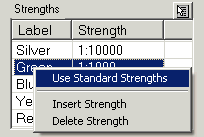
In the Strengths section, you can configure the
serum strengths and the corresponding labels. To modify a Label or Strength,
simply click into the applicable cell, and then select the proper Label
or Strength.
You also have the ability to insert and delete strengths, as well as
using a set of standard strengths as needed, by right-clicking in the
Strengths grid, and then selecting Use Standard Strengths/Insert Strength/Delete
Strength; or by clicking the Strengths button, and then selecting Use
Standard Strengths/Insert Strength/Delete Strength.
In the Venoms section, check any applicable Venoms for the patient's shot order.
There are seven standard venoms that can be prescribed as part of a shot
order for a patient. They are Yellow Jacket, Honey Bee, Wasp, Yellow Hornet,
White-Faced Hornet, Fire Ant and Mixed Vespid. The first six venoms come
in strengths of 1mcg/cc, 10 mcg/cc and 100 mcg/cc. The Mixed Vespid, which
is a standard combination of three other venoms, comes in strengths of
3 mcg/cc, 30 mcg/cc and 300 mcg/cc.
Venoms are not specifically made for a certain patient. Every patient
who is prescribed certain venom at certain strength gets their shots from
the same vial. Since patients share the same venom vials, standard venoms
are kept in stock, and are not mixed when a serum order is formulated.
You also have the ability to insert and delete venoms as needed, by
right-clicking in the Venoms field, and then selecting Insert Venom/Delete
Venom; or by clicking the Venoms button, and then selecting Insert Venom/Delete
Venom.

Configure the Serum Sequence and/or the Venom
Sequence, as needed.
The serum/venom sequence is the schedule or progression of shots. If
a shot order contains multiple serum vials, all serum shots will have
a common serum shot sequence. If a shot order contains multiple venoms,
all venom shots will have a common shot sequence. The serum sequence and
the venom sequence will not be the same.
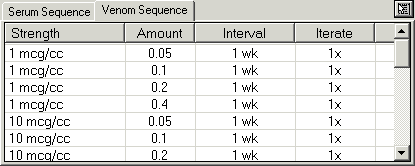
Each line in a sequence will contain four components: Strength, Amount,
Interval between shots, and Iteration count for that sequence line. For
instance, the first line could be: 0.05 cc’s of strength Silver, weekly,
for 1 time. This means, that the patient will get a shot containing 0.05
cc’s of serum strength Silver, every week, for one week. After
that week, the next line in the sequence will be used.
You can modify the Strength, Amount, Interval, and Iterate for each
line by clicking into the applicable cell and selecting the desired Strength,
Amount, Interval, or Iterate.
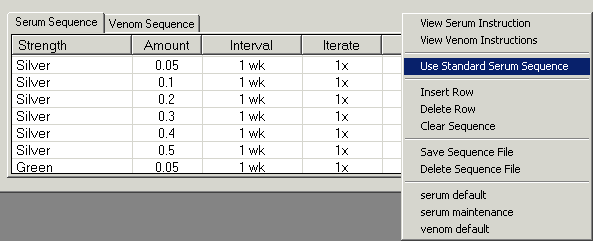
You can also click the Sequence button, and select to Use
Standard Serum Sequence, Insert
Row, Delete Row, or Clear Sequence to modify the sequence
as desired. Likewise, you can save a configured serum/venom sequence so
that it can be used in other orders by clicking Save
Sequence File. Or, you can save the configured serum/venom sequences
as the default sequence by clicking Save
Serum Sequence as Default. You can then select the default sequence
by clicking the Sequence button, and selecting serum
default or venom default.
Once the Serum Sequence has been configured, click Venom
Sequence tab and repeat the process described above to configure
the shot sequence for venoms.
Check the Skip
Formulation option, if applicable. In rare cases, the new shot
order might not include serums, and include venoms only. In these cases,
there is no serum to formulate. If the physician checks the Skip Formulation
checkbox prior to saving the order, then the serum status will be updated
to OK, indicating that there is no serum to formulate.
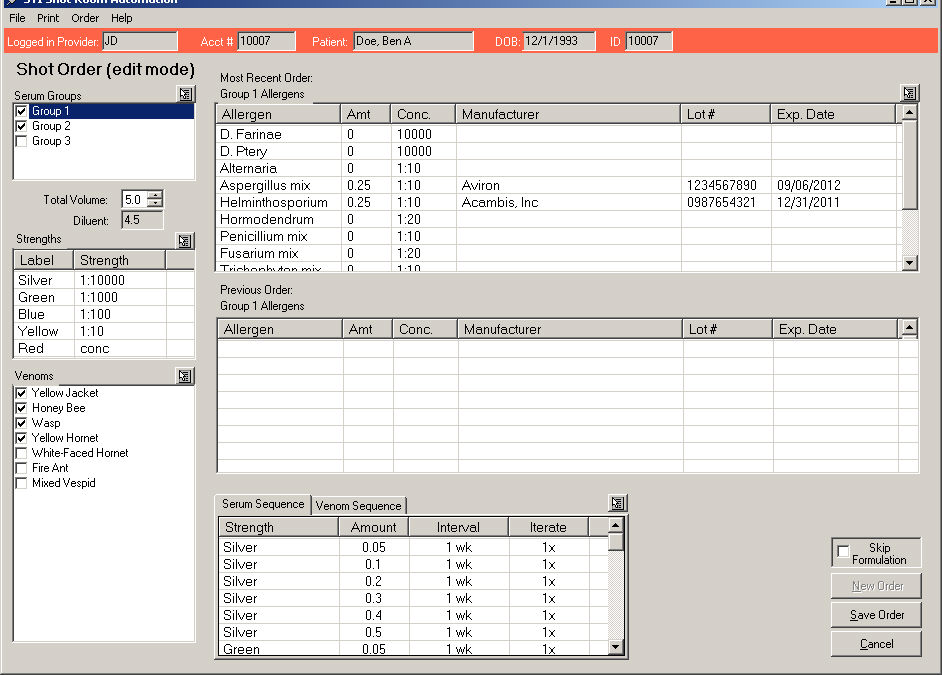
When finished with the new order, click the Save Order button.
The Shot Order dialog will close and the patient's
flow sheet will list the new order. Do note that if a mistake was made
and an incorrect line appears in the flow sheet, you can click the Delete Last Line button to delete the
last entry in the patient's flow sheet. Click the Save
FlowSheet button when finished.

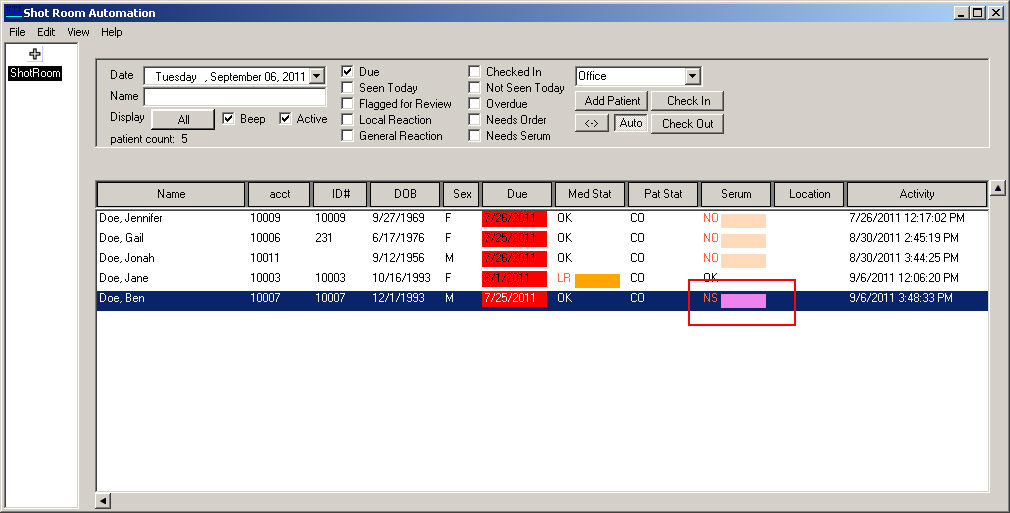
In the Shot Room Automation dialog, the patient's
Serum status will be updated to NS (Needs Serum) to indicate that the
serum needs to be formulated for this patient. The serum can now be formulated
for this patient.