Open the Template that you want to add a Medication
button to.
In the Template Editor, click Medication.
Position the cursor where you want the Medication
button to appear in the template.
Click the  button.
The  button will then appear in
the template. Right-click the
button will then appear in
the template. Right-click the  button.
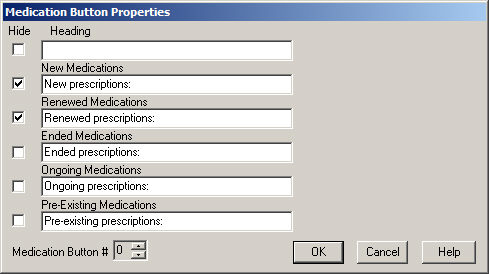
In the Medication Button Properties dialog, you
have the ability to determine the verbiage that precedes the various types
of medication information that is outputted when prescription events are
configured via the medication button, as well as whether or not you want
to hide this information for this medication button. Check the Hide
box next to the medication output information you would like to hide for
this medication button, and then click into the corresponding fields and
enter or modify the verbiage for the Heading or for each type of prescription
event as needed.
In the Medication Button # field, enter or select
an ID Number for the medication
button.
NOTE: When configuring multiple medication buttons in a chart template,
each medication button requires a unique Medication Button # to act independently
of each other and to output the proper medication information configured.
The Medication Button # is attached to each medication event that is configured
via that particular button and will only output medication information
that was entered through that button.
When finished, click the OK button.