Open the Template that you want to add a vital
signs button to.
In the Template Editor, click Vital
Signs.
Position the cursor where you want the vitals
button to appear in the template.
Click the  button. The vitals button
will then appear in the template.
Click the  button to configure the
vital signs heading.
In the Vital Signs Heading dialog, enter the Heading for the Vitals button you are
adding, and then click the OK
button. The heading text will then appear to the left of the Vitals button
in the chart note.

Right-click the Vitals button, and then click
Edit Properties... to configure
the vital signs preferences.
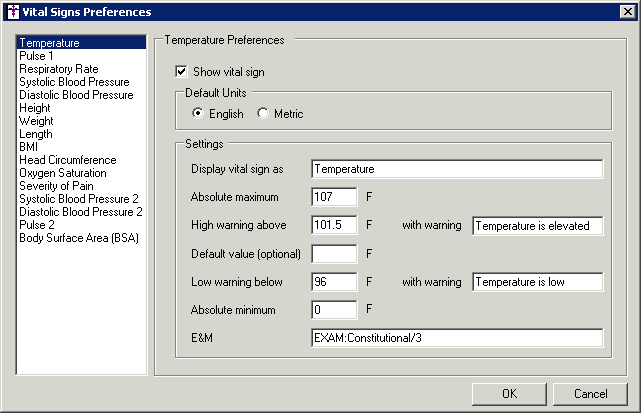
The Vital Signs Preferences dialog will appear
allowing you to configure the preferences for each of the individual vital
sign options in the Vital Signs Entry dialog. The left side of the dialog
will display all of the available vital signs. To configure the preferences
for an individual vital sign, highlight that vital sign in the left side
of the dialog.
The right side of the dialog will display the preferences for the highlighted
vital sign. Every vital sign has a Show
vital sign preference that determines whether the vital sign option
will be available in the Vital Signs Entry dialog accessed via this Vitals
button. Check the Show vital sign
preference if you want this vital sign to be available.
Each vital sign option will also have a Default
Units section that becomes available when applicable, and allows
you to select English or Metric units to be the default for that
vital sign.
The Settings section will show
various setting preferences for the selected vital sign. All of the vital
sign options will have a Display vital
sign as field that allows you to configure what will display in
the Vital Sign column of the Vital Signs Entry dialog for that item.
The Temperature, Pulse 1, Respiratory Rate, Systolic Blood Pressure,
Diastolic Blood Pressure, Height, Weight, Length, Head Circumference,
Oxygen Saturation, Systolic Blood Pressure 2, Diastolic Blood Pressure
2, and Pulse 2 vital sign options have the same setting fields.
The Absolute maximum field,
allows you to enter the highest value that can be entered for that vital
sign.
The High warning above field
and corresponding with warning
field, allows you to enter the value above which the value should show
in red, and the corresponding warning message that should display.
The Default value (optional)
field allows you to enter a value which will default for all patients
for the selected vital sign.
The Low warning below field
and corresponding with warning
field, allows you to enter the value below which the value should show
in red, and the corresponding warning message that should display.
The Absolute minimum field,
allows you to enter the lowest value that can be entered for that vital
sign.
The E&M field, allows you
enter the proper E&M
Code
to link to the E&M Guidelines dialog, if applicable.

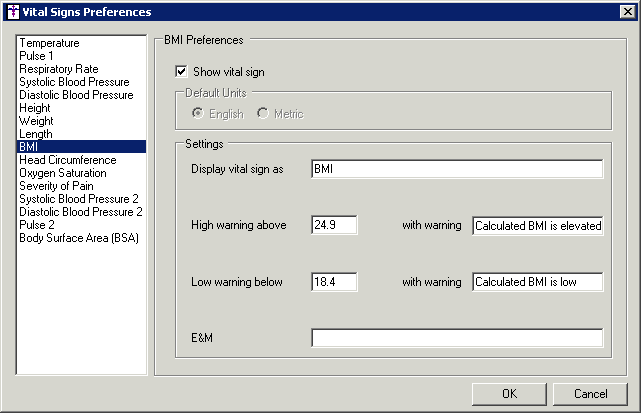
The BMI and Body Surface Area (BSA) vital sign options have the same
settings fields.
The High warning above field
and corresponding with warning
field, allows you to enter the value above which the value should show
in red, and the corresponding warning message that should display.
The Low warning below field
and corresponding with warning
field, allows you to enter the value below which the value should show
in red, and the corresponding warning message that should display.
The E&M field, allows you
enter the proper E&M
Code
to link to the E&M Guidelines dialog, if applicable.

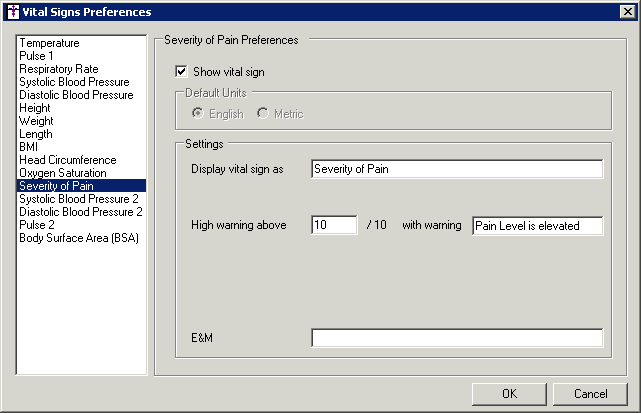
The Severity of Pain vital sign option has a High
warning above field and corresponding with
warning field, allows you to enter the value above which the value
should show in red, and the corresponding warning message that should
display.
There is also an E&M field,
that allows you enter the proper E&M
Code
to link to the E&M Guidelines dialog, if applicable.

When the preferences has been configured for the vitals signs as desired, click the OK button.