Open a patient's chart note.
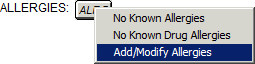
In the chart note, click the ALRG
button, and then select Add/Modify Allergies.
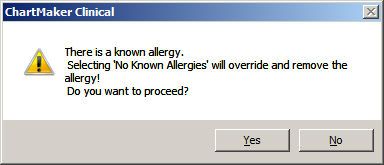
NOTE: If you select the No Known Allergies
or No Known Drug Allergies option,
the system will generate a warning indicating all of the allergies will
be overridden and removed if you choose to proceed.
If you click the OK button
the system will remove all allergy information and the chart note, Face
Sheet, History tab, and Audit Trail will contain applicable entries for
the allergies removed and the new option selected.
If you click the Cancel button,
you will return to the patient's chart.
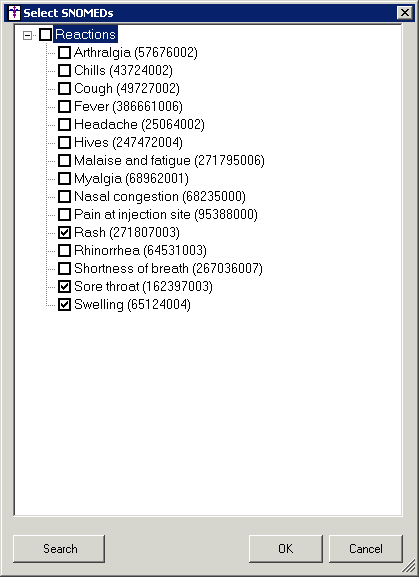
In the Active Allergies dialog, click the Add or Edit
button button in the Reaction
SNOMED field to configure applicable SNOMED codes for any reactions that
the patient has to the allergen.

In the Select SNOMEDs dialog, check or uncheck
the applicable reactions as needed. If you do not see the applicable reaction
or SNOMED code, you can click the Search
button and search for specific SNOMED codes as needed.
When finished configuring the applicable SNOMED codes, click the OK button.
Select or modify the Severity
of the allergic reaction (Fatal, Life threatening severity, Mild, Mild
to moderate, Moderate, Moderate to severe, and Severe), if needed.
Check the Note
Allergy option if you want the allergy to print in the chart note.
Check the Note
Reaction option if you want the reaction to print in the chart
note.
If the allergy information has been reviewed,
click the Review button, or, if
you are reviewing all of the applicable allergens, click the Review
All button. The date of the note will appear in the Reviewed column
for reviewed allergens. Likewise, when allergies are reviewed the review
date appears in the Face Sheet beside the allergy and the History tab
is updated with this information.
Check the Display
results in list format box if you want the allergy information
to appear as a list instead of in paragraph format.
Add
an Allergy
for the patient, if needed.
Remove
an Allergy
for the patient, if needed.
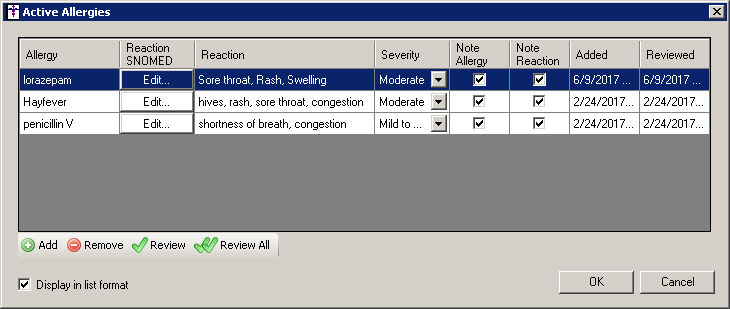
When finished updating the allergy information, click the OK button. The modifications and additions will only be updated in the patient's chart after the OK button has been clicked. If you close out of the dialog, or click the Cancel button, the information will revert to the previously configured information in the Active Allergies dialog.