Open the patient's chart note.
Click the  button in the chart note.
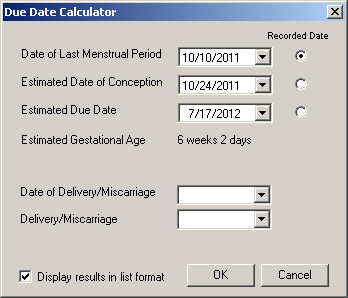
In the Due Date Calculator dialog, select the
Date of Last Menstrual Period,
Estimated Date of Conception,
or Estimated Due Date in the corresponding
field.
If the Date of Last Menstrual Period is entered, the system will automatically
calculate the Estimated Date of Conception, Estimated Due Date, and Estimated
Gestational Age based on that information. Once these dates have defaulted,
you have the ability to change them as needed. If the Estimated Date of
Conception is modified, the Estimated Gestation Age will automatically
be recalculated.
If the Estimated Date of Conception is entered, the system will automatically
calculate the Estimated Due Date and Estimated Gestational Age based on
that information. Once these dates have defaulted, you have the ability
to change them as needed. If the Estimated Date of Conception is modified,
the Estimated Gestation Age will automatically be recalculated.
If the Estimated Due Date is entered, the system will automatically
calculate the Estimated Date of Conception and Estimated Gestational Age
based on that information. Once these dates have defaulted, you have the
ability to change them as needed. If the Estimated Date of Conception
is modified, the Estimated Gestation Age will automatically be recalculated.
In the Date of Delivery/Miscarriage field, select
the Date of Delivery or Miscarriage,
if applicable.
In the Delivery/Miscarriage field, select Abortion, Delivery,
or Miscarriage for the outcome
of the pregnancy, if applicable.
Check the Display
results in list format option if you want the configured information
to appear in the chart note in list format. If this option is not selected,
the results will appear in paragraph format.
When finished, click the OK
button and the configured pregnancy information will appear in the chart
note. The information will then be tracked in the History tab, and will
also be counted towards the applicable Meaningful Use objectives and/or
quality measures.

Likewise, when pregnancy information is entered in the chart note,
the information will appear in the Face Sheet under a customizable Pregnancy
section. You have the ability to decide what information will appear in
this section by right-clicking the Pregnancy header and selecting Add/Remove
Pregnancy Date. In the Pregnancy Data Selection dialog you can then add
and/or remove the applicable items you want displayed in the face sheet.
