Open the Template that you want to add an numeric
counter to.
In the Template Editor, click Numeric.
Position the cursor where you want the counter
to appear in the template.
Click the  button, or double-click
Numeric. The numeric counter
button, or double-click
Numeric. The numeric counter  will then appear in the template.
Right-click the numeric counter, and then click
Edit Properties... to configure
the numeric limits and other properties of the counter.
In the Numeric Field Properties dialog, click
the Conditions
button if you want to attach this numeric field with a result that can
be tracked by the flow sheet.
In the Label field, enter the Label
for the numeric counter.
In the Unit field, enter the type of Unit
you want the number in the numeric counter to be identified by (i.e.,
cc or ml or lbs, etc.).
Check the Allow
Negative Numbers if applicable.
In the Absolute minimum field, enter the Lowest Number that can be used for the
numeric counter in a chart note.
In the Low warning below field, enter the Number for which you want an abnormal
warning box to appear, and then in the corresponding warning messages
field, enter the Warning Message
you want to appear.
In the High warning below field, enter the Number for which you want an abnormal
warning box to appear, and then in the corresponding warning messages
field, enter the Warning Message
you want to appear.
In the Absolute maximum field, enter the Highest Number that can be used for
the numeric counter in a chart note.
In the Spinner Increment field, enter the Numeric Value you want the numeric counter
to increment by when the up or down arrow is clicked. For example, you
may want the spinner to go up or down in increments of three or five.
You can even set it for .1, .3, or .5, etc.
In the Decimal places field, select the number
of Decimal Places you want to
appear in the numeric counter.
In the E&M field, enter the proper E&M
Code
to link to the E&M Guidelines dialog, if applicable.
In the Default Value field, enter the Default
Number at which the numeric counter should start.
Whenever a condition is attached to a numeric
field, the Allow Positive/Negative Findings
checkbox option will activate, allowing you to further define the numeric
with a positive or negative finding in the chart note. Check the Allow Positive/Negative Findings option,
if needed.
NOTE: When this option is selected, a pop-up dialog will appear after
a value is entered for the corresponding numeric in the chart note, allowing
you to manually select whether the result is a positive or negative finding.
When a positive finding is selected, the SNOMED Concept ID of 441773004
will be written to the database, and when a negative finding is selected,
the SNOMED Concept ID of 442225006 will be written to the database. When
positive/negative finding information is entered in the chart note, the
information will be tracked and counted towards the applicable Meaningful
Use objectives and/or quality measures.
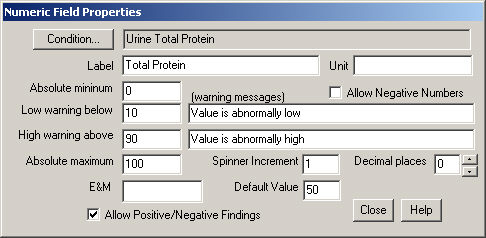
When finished, click the Close button.