Click Reports
> Reports... to access the Reports dialog.
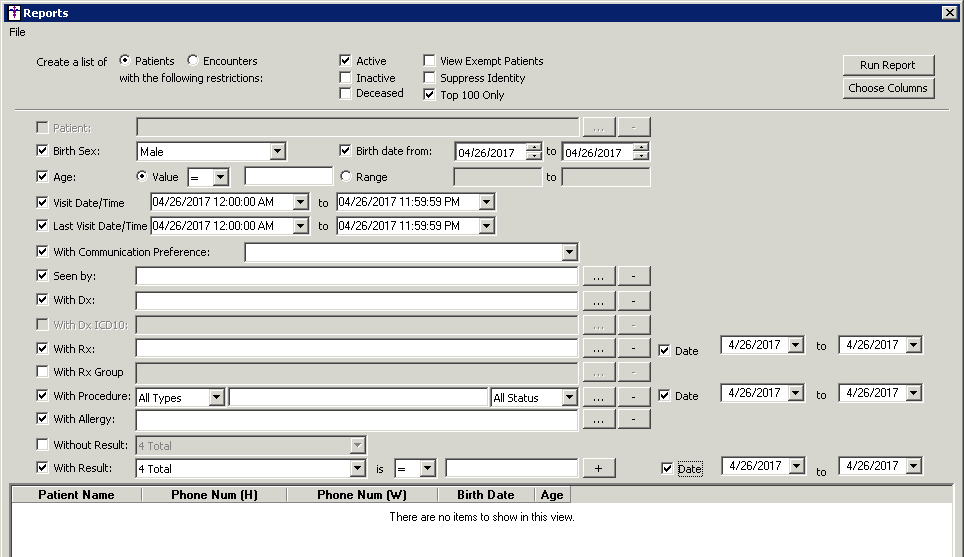
In the Reports dialog, click the Patient
radio button if you want to create a list of patients, or click the Encounters radio button if you want
to create a list of encounters.
Check the Active,
Inactive, or Deceased
box if you want the report to list patients with these status types.
Check the View
Exempt Patients option if you want to view any patients whose Exempt
From Reporting option was selected in the ID tab. These patients can be
viewed, however the demographic information for these patients will
not be printed in any reports.
Check the Suppress
Identity option if you would like to exclude any identification
items from the report list. When this option is selected the Column selection
accessed via the Choose Column button will automatically gray out any
identification items, thereby ensuring that this type of information is
not included.
Check the Top
100 Only option if you would like to only view the top 100 entries
of the report.
Click the Choose
Columns button and select the Columns
you want to include in the report.
Check the Birth
Sex box, and select Female,
Male or Unknown,
if applicable.
Check the Birth
date from box and configure the Date
Range in the corresponding fields, if applicable.
Check the Age
box, and then click the Value
radio button and configure the accompanying Age
Parameters if you want the
report to list patients with an age equal to (=), less than (<), or
greater than a specified age, or click the Range
radio button and configure the accompanying Age
Range if you would like the report to list patients within an age
range.
Check the Visit
Date/Time box and configure the Visit
Date/Time Range in the corresponding fields, if applicable.
Check the Last
Visit Date/Time box and configure the Last
Visit Date/Time Range in the corresponding
fields, if applicable.
Check the With
Communication Preference if you would like to include those patients
that have a particular Reminder Preference configured, and then select
Phone or Postal
Mail.
Check the Seen
by box, and select the applicable
Providers,
as needed.
To remove an individual provider from the report, click the  button, and then click the provider you want to remove.
Check the With
Dx box if you want to include ICD9 diagnoses in the report criteria,
and then select the applicable ICD9
Diagnosis Codes
as needed.
To remove an individual diagnosis from the report, click the button, and then click the diagnosis you want to remove.
Check the With
Dx ICD10 box if you want to include ICD10 diagnoses in the report
criteria, and then select the applicable ICD10
Diagnosis Codes
as needed.
To remove an individual diagnosis from the report, click the button, and then click the diagnosis you want to remove.
Check the With
Rx box if you want to include specific medications (drugs) in the
report criteria, and then select the applicable Medications
as needed.
To remove an individual medication from the report, click the button, and then click the medication you want to remove.
When the With
Rx option is selected you have the ability to select a Date
range that allows you to query patient charts to display a list of patients
that were taking the selected medication within the configured date range.
Check the Date box, and then select
the desired date range in the corresponding fields, if applicable.
Patients will be considered taking the medication if: the Patient was
prescribed or renewed a drug within the date range; the Patient was prescribed/renewed
the drug before the date range, but it was discontinued within the date
range; or the Patient was prescribed/renewed the drug before the date
range, but it was discontinued after the date range, or it has not yet
been discontinued.
Check the With
Rx Group box if you want to include medication (drug) groups in
the report criteria, and then select the applicable Medication
Group
as needed.
To remove an individual medication from the report, click the button, and then select the medication (drug) group you want
to remove.
Check the With
Procedure box if you want to include procedures in the report criteria.
Select Type of procedure (All,
Image, Immunization, Lab, Test), as needed, then select the Status
(All, Pending, Completed, Reviewed, Due; this latter option allows you
to run a report for patients that are due or overdue for a certain procedure),
and then select the applicable Procedures
as needed.
To remove an individual procedure from the report, click the button, and then click the procedure you want to remove.
NOTE: If the All Status is
selected, at least one Procedure needs to be selected to run the report.
When the With
Procedure option is selected, and the status is All
Status, Pending, Completed, or Reviewed,
you have the ability to select a Date
range that allows you to query patient charts to display a list of patients
that have the selected procedure within the configured date range. The
Date fields will be disabled when the Due
status is selected. Check the Date
box, and then select the desired date range in the corresponding fields,
if applicable.
Check the With
Allergy box if you want to include allergy information in the report
criteria, and then select the applicable Allergy
as needed.
To remove an individual allergy from the report, click the button, and then select the medication (drug) group you want
to remove.
Check the Without
Result box if you want to generate a report for patients that do
not have a particular result, and then select the applicable Result.
NOTE: When the Without Result option is selected the With Communication
Preference, Seen by, With Dx, With Rx, With Rx Group, With Procedure,
and With Result options will be grayed out and you will not be able to
include those items in the report.
Check the With
Result box if you want to include a Result in the report criteria.
Select the Result
that you want to include, and then configure Result
Parameter (=,
<, >, <=, >=, Yes,
No) in the next field, and then
the Result Value in the next field.
When the With
Result option is selected, you have the ability to select a Date range that allows you to query
patient charts to display a list of patients that have the selected result
within the configured date range. Check the Date
box, and then select the desired date range in the corresponding fields,
if applicable.
To add another Result to be included in the report
click the  button, and repeat steps 24 and 25. You have
the ability to add up to five (5) results and a separate date range for
each selected result.
button, and repeat steps 24 and 25. You have
the ability to add up to five (5) results and a separate date range for
each selected result.
When finished configuring the report criteria,
click the Run Report button.
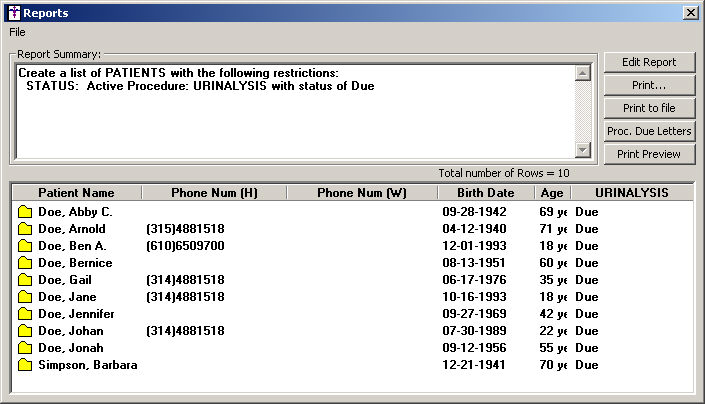
After the report has been run the Report Summary
will display the results of the report. From the Report Summary you can
edit the report to get additional or different results, print
the report, preview the report, or print procedure due letters
based on the report results.
Click the Edit Report to add
or modify the report restrictions.
Click the Print button to print
the results of the report. In the Print dialog, select the printer you
want to print to, and then click the OK button. The report will now print.
Click the Print to File button
to print the results of the report to a file. After you click the Print
to File button, a Print to File dialog will appear allowing you to select
the location to save the file.
Click the Proc.
Due Letters
button to select a form letter that you can print out or print to file
for all of the patients captured in the report.
Click the Print Preview button
to preview the results of the report. After you click the Print Preview
button, the results of the report will be displayed in a Report
Preview
dialog.
Double-click a Patient or an
Encounter to open that patient's
information or chart note.
To save the report configuration so you run this
report at a later time, click File >
Save. In the Name your report field, enter a Name
for you report configuration, and then click the OK
button.
NOTE: If you have modified a saved report and you want to save those
modifications for the report, click File
> Save. The ChartMaker® Clinical dialog will appear as it did
when you created the report, but will have the current name of the report
highlighted. Click the OK button.
A dialog will then appear asking, "File already exists, overwrite?"
Click the Yes button. You modifications will that be added to the report.
To open a saved report, click File
> Open and then select the Saved
Report you want to open.