Click the User
Groups & Practices tab.
Only users that have Administrative-Security privileges are allowed to configure and modify privileges for other users. Use the following steps to configure or modify privileges for a User.
Click Edit >
System Tables > Users.
In the Users dialog, double-click the User
you want to configure privileges for.
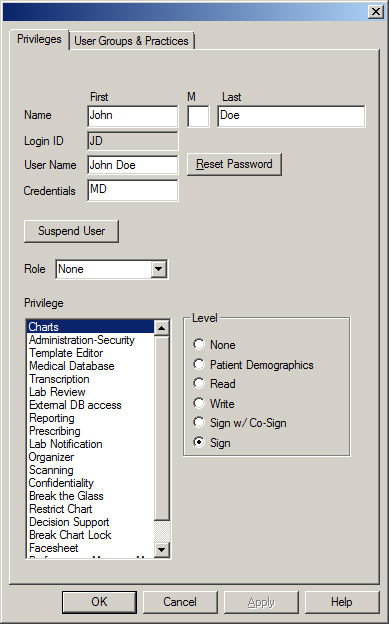
Click the Privileges
tab.
In the Name field, add or modify the First,
Middle initial, and/or the Last name for the user.
In the User Name field, add or modify the user's
User Name, if applicable.
Click the Reset
Password button to reset the selected user's password.
In the Credentials field, enter or modify the
applicable Credentials for this
user.
NOTE: If a Provider is linked to the User, and no information is entered
in the Credentials field, the Provider’s Degree will default into this
field if entered in the Providers Properties dialog. Likewise, this field
is linked with the Credentials field in the Provider Properties dialog,
so that any changes in one field will be automatically updated in the
other field.
Click the Suspend
User to deny access to ChartMaker®
Clinical for the selected user. To activate a suspended user, click the
Activate User button.
The Role field allows you to select a predefined
security setting for a Receptionist
or Security
Administrator.
These settings then can be modified as needed. In the Role field, select
Receptionist or Security
Admin as applicable.
Highlight the Privilege you want to configure, and then click the appropriate Privilege Level radio button.
Charts: allows you to configure the level of privilege that a user has when working with patient charts. The provider or user can have the following level of chart privilege: None (cannot access patient charts), Patient Demographics (can view, add, and modify patient demographic information only), Read (can only read chart notes, cannot add or modify information in chart notes, however, user can add and modify patient demographic information), Write (can view, add, and modify chart notes and patient demographic information), Sign w/ Co-Sign (can view, add, and modify chart notes and patient demographic information and sign notes, but must have a user with full sign privileges co-sign the chart note), or Sign (can view, create, modify chart note and patient demographic information as well as sign chart notes).
Administration-Security: allows the selected user the ability to access the preferences, system tables, the audit system, and user security. There are four levels of privilege for Administration-Security: None (cannot add, modify, or view any patient information; cannot access preferences, system tables, or the audit system, and therefore user security), Clinical (cannot add, modify, or view any patient information; cannot access the audit system; can access the preferences and system tables, but cannot access the User Security tab in the preferences, or the Users in the system tables), Security (cannot add, modify, or view any patient information; can access the audit system; has a limited access to preferences [User Security only] and the system tables [Users and Providers only]), and All (has access to all patient information, preferences and system tables).
Template Editor: allows the selected user to access, create, and modify ChartMaker® Clinical templates via the template editor. There are two levels of privilege for the Template Editor: None (cannot access, create or modify templates) and All (can access, create or modify templates).
Medical Database: allows the selected user the ability to add and modify procedures, diagnosis, medications, etc. to the system tables. There are two levels of privilege for the medical database privilege: None (cannot add and modify procedures, diagnosis, medications, etc.) and All (can add and modify procedures, diagnosis, medications, etc.).
Transcription: allows the selected user to be able to read or not read notes that have been signed. There are two levels of privilege for the Transcription: None (cannot read signed notes) and Signed Notes Readable (can read signed notes).
Lab Review: allows the selected user to review incoming electronic labs. There are two levels of privilege for Lab Review: None (cannot view labs) and All (can view labs).
External DB Access: allows the selected user the ability to connect to the database for repairs and updates. There are two levels of privilege for External DB Access: None (cannot connect to the database) and All (can connect to the database).
Reporting: allows the selected user to generate reports. There are two levels of privilege for Reporting: None (cannot generate reports) and All (can generate reports).
Prescribing: allows the selected user the ability to prescribe medications. There are three levels of privilege for Prescribing: None (cannot prescribe medications), Proxy (user can prescribe for a registered Prescriber, however, a proxy cannot utilize E-Prescriptions), and Prescriber (can prescribe medications).
Lab Notification: designates the selected user to receive every incoming electronic lab result in their To-Do List. There are three levels of privilege for Lab Notification: None (will not receive labs), Receive ALL lab results (will receive all lab results in To-Do List), and the Receive Un-Matched (will receive only those labs that do not match to a patient or do not match to a provider).
Organizer: allow you to configure the level of privilege that a user has when working with the organizer. There are four levels of privilege for the organizer: None (no privileges), Assign Notes (allows a user to put documents into specific folders), Manage Folders (allows the user to rename and/or recolor the folders), and All (allows the user all privileges).
Scanning: allows the selected user access to the document management screens and allows you the ability to scan documents into ChartMaker® Clinical. There are two levels of privilege for Scanning: None (cannot scan documents) and Scanner (can scan documents).
Confidentiality: allows the selected user to access, enter, and view confidential information for a patient. There are two levels of privilege for the Confidentiality privilege: None (cannot access, enter, or view confidential information for a patient; when a user who does not have access to Confidential information opens a chart that contains confidential information, that section appears blank to the user, if that user clicks the Confidential button within the note, nothing will happen) and Access Granted (can access, enter, modify, and view confidential information for a patient).
Break the Glass: allows the selected user the ability to access a chart that they have been restricted from accessing. Whenever the user accesses a restricted chart and "breaks the glass," an audit event will be tracked in the Audit Trail (if enabled) displaying the patient whose chart was accessed, the user who accessed the chart and the date and time of the event. There are two levels of privilege for the Break the Glass privilege: None (cannot access restricted charts) and All (can access restricted charts).
Restrict Chart: allows the selected user to restrict patient charts from being accessed by other users, as well as having the ability to determine what users are allowed to access a patient's chart. There are two levels of privilege for the Restrict Chart privilege: None (cannot restrict patient charts) and All (can restrict patient charts and determine what users can access a patient's chart).
Decision Support: allows the selected user to create and manage decision support rules and to view and interact with decision support alerts that triggered by the decision support rules. There are two levels of privilege for the Decision Support privilege: None (cannot create and manage decision support rules and alerts) and All (can create and manage decision support rules and alerts).
Break Chart Lock: allows the selected user the ability to "unlock" a chart that is currently being used by another user. Whenever the user accesses a locked chart and "breaks the chart lock," an audit event will be tracked in the Audit Trail (if enabled). There are two levels of privilege for the Break Chart Lock privilege: None (cannot unlock charts that are currently in use by another user) and All (can unlock charts that are currently in use by another user).
Facesheet: allows the selected user the ability to modify the global facesheet settings. There are two levels of privilege for the Facesheet privilege: None (cannot modify the global facesheet settings) and All (can modify the global facesheet settings).
Performance Measure Mapping: allows the selected user the ability to add CPT Codes to the Meaningful Use Encounter Codes list that is used to calculate various performance measures for Meaningful Use. There are two levels of privilege for the Performance Measure Mapping privilege: None (cannot access or modify the Meaningful Use Encounter Codes list) and All (can access and modify the Meaningful Use Encounter Codes list).
Drug Interaction: allows the selected user the ability to adjust the Drug Interaction Setting in the Prescription preferences for drug to drug severity interactions. There are two levels of privilege for the Drug Interaction privilege: None (cannot access or modify the Drug Interaction Setting) and All (can access and modify the Drug Interaction Setting).
Logical Access: allows the selected user the ability to administer EPCS (Electronic Prescription of Controlled Substances) capabilities to qualified practitioners. At least two users need to be assigned the Logical Access privilege before the EPCS Prescriber Setup functionality can be accessed. Likewise, at least one of the users must be an IdenTrust Token holder and a practitioner who is a DEA registrant in good standing. There are two levels of privilege for the Logical Access privilege: None (cannot administer EPCS capabilities to qualified practitioners) and Authorized (is authorized to cannot administer EPCS capabilities to qualified practitioners).
Medication Prior Authorization: allows the selected user the ability to access the ePA Status dialog (accessed via Chart > Medication Prior Authorization > Check Status). Once a user is enabled with the Medical Prior Authorization privilege, their level of access within the ePA Status dialog can be configured in the Medication Prior Authorization Management dialog (accessed via Chart > Medication Prior Authorization > Management) There are two levels of privilege for the Medication Authorization privilege: None (cannot access the ePA Status dialog) and Enabled (can access the ePA Status dialog; level of access determined via the Medication Prior Authorization Management dialog).
Patient Data Export: allow administers to limit what users have access to the patient data exporting functionality. There are three levels of privilege for the Patient Data Export: None (the selected user will not be able to access the Export Patient Data, Schedule Patient Data Export, and Transition of Care Export dialogs to export patient data, schedule patient data to export, or export TOC documents for all patients in the system), Export (the selected user will have access the Export Patient Data dialog and the Schedule Patient Data Export dialog to export patient data and schedule patient data to export, but will not have access to the Transition of Care Export dialog to export TOC documents for all patients in the system), and All (the selected user will have access the Export Patient Data, Schedule Patient Data Export, and Transition of Care Export dialogs and will be allowed to export patient data, schedule patient data to export, and export TOC documents for all patients in the system).
Mobile Administration: allows the selected user the ability to access the Mobile Administration dialog and administer users and practices for the mobile app, as well as to view the Mobile Audit Trail. There are two levels of privilege for the Mobile Administration privilege: None (cannot access or administer mobile administration capabilities) and Authorized (is authorized to access and administer mobile administration capabilities).
Manage
Direct Addresses:
allows the selected user the ability to access the Manage Direct Addresses
dialog where they can assign the direct message addresses a user can use
when sending or replying to direct messages. There are two levels of privilege
for the Manage Direct Addresses privilege: None
(cannot access the Manage Direct Addresses dialog or assign direct message
addresses for users) and Authorized
(is authorized to access the Manage Direct Addresses dialog and assign
direct message addresses for users).
Click the User
Groups & Practices tab.
The User Groups & Practices tab displays all
of the User Groups and Practices the selected user belongs to.
To add a new User Group or Practice, click the Add
button, highlight the User Group
or Practice in the User Group
dialog, and then click the OK
button. Repeat this step to add additional groups or practices.
To remove a User Group or Practice, highlight the User
Group or Practice that
you want to remove, and then click the Remove
button. Repeat this step to remove additional groups or practices.
To allow this user to have Administrative permissions for a User Group
or Practice, highlight the User Group
or Practice that you want to set
Administrative permissions for, and then click the Admin
button. A black dot will then appear next to the selected group or practice.
When finished, click the OK
button.
Repeat steps 2 - 11 to configure or modify privileges for additional users.